Toyota Hiace Super Custom Owners Forum
Would you like to react to this message? Create an account in a few clicks or log in to continue.
Toyota Hiace Super Custom Owners Forum

Anything Toyota Hiace related
 
HomeHome  PortalPortal  GalleryGallery  SearchSearch  Latest imagesLatest images  RegisterRegister  Log in  


 My LH119

Go down 
+2
parxuk
LH119V
6 posters
Go to page : 1, 2  Next
AuthorMessage
LH119V
Hiace Master
Hiace Master


Number of posts : 510
Home City : p
Registration date : 2021-04-13

My LH119 Empty
PostSubject: My LH119   My LH119 Icon_minitimeFri Apr 01, 2022 5:30 pm

Hello folks.

Have noticed a few new posts in this section, but not included mine.

Here are a couple of pre-purchase picture, so you can see what's what.
My LH119 0110

My LH119 0410

For those that want to know it's -RRMES, 3L, G52, G145. As I've put elsewhere, the van is having a 30y refresh. it'll look subtly different only and hopefully fit for another 30 years!

Here's a detailed picture from the model manual of the inside:
My LH119 2022-110

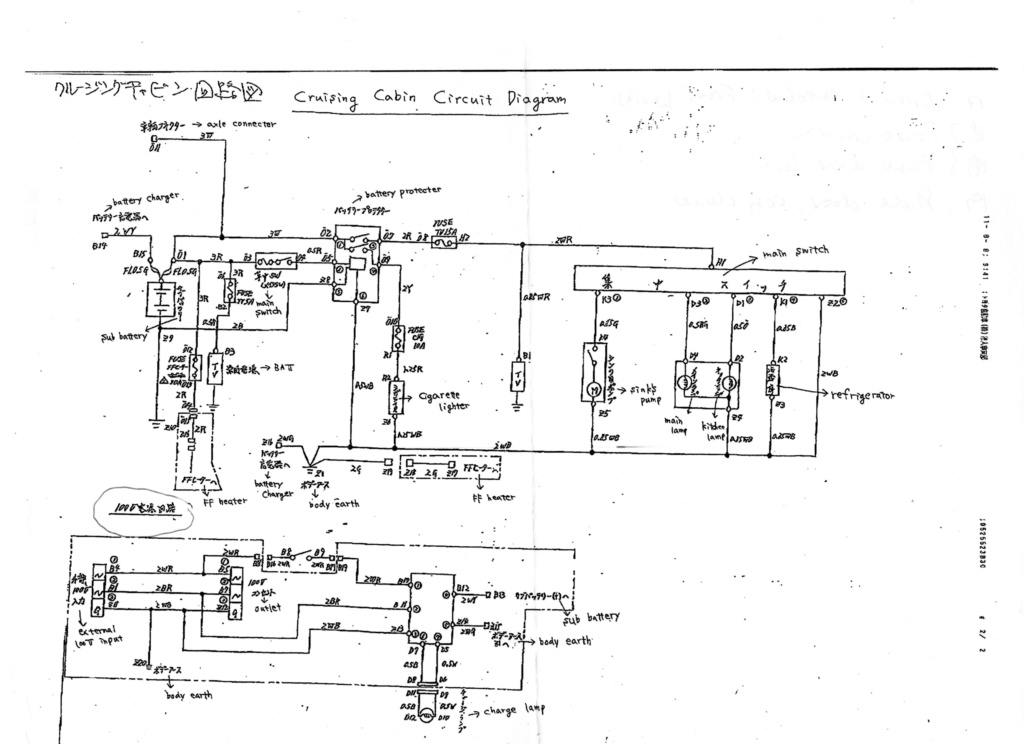
Here’s a picture of the wiring diagram I received when I bought the van. It’s a scanned version and as detailed as I could reasonably make it. I have no further details where it originally came from so it’s WYSIWIG:
My LH119 Cc_wir10

Here's a picture of the OEM A/C quantities, etc. I've not translated the rest:
My LH119 Receip11

R134-a is the current replacement refrigerant.

Here's some performance details I found for the fridge:
My LH119 Fridge10

As you can see, these are for Model SR70F, while mine seems to be Model SRBD-543A-T (47L, DC12V, 3.7A, 44W, with 60g of R12) based on the internal label so they might not be exactly like-for-like. I have a French manual that shows the SR70F to be a 12V undercounter type (likely newer), but still designed for camper / RV installation. So, I hope the graphs and other info show how much current draw to expect and what the likely duty-cycle might be at different control position settings and what the internal temperature results are. Your mileage might vary.

Please feel free to ask any questions.

Cheers

Manuals and parts
Probably the most common questions on the forum are for manuals, about parts or related electrical matters.
In this post I’m going to try to set out my understanding and offer some guidance and advice. I certainly don’t want to detract from people asking or answering question, but a bit like my post on the cooling system (see below) I hope this is a sort of post once, refer to many times, which helps members use the available resources. I’ll try to update it with new areas.

My starting point is from the perspective that most of the Hiaces that are on this forum are between ~35 to 10 years old, which is quite a big spread. Many are Japanese Domestic Market (JDM) vehicles so have been latterly exported to countries where we buy them or they were exported to order. The point is that they were not built for export, nor (generally) build in third-countries for domestic use. This means that often the pool of vehicles in import countries is small and there is therefore limited knowledge among normal garages, accompanying literature is in Japanese and parts supply and knowledge can be sketchy.

I’m going to try to cover as many use cases as possible and starting with identifying vans. The Wikipedia page:
https://en.wikipedia.org/wiki/Toyota_HiAce
is a good general starting point. Wikipedia is also a good, general resource for many sub-assemblies (engines, gearboxes etc) that are often shared across the Toyota or other Japanese vehicles (more later).


Build plate
The first thing to do is to find, note down and decode the build plate, which is riveted to the body and can be found under the front passenger seat (LH). This build plate is sometimes called a VIN plate (https://en.wikipedia.org/wiki/Vehicle_identification_number), but either because of age, or that JDMs didn’t use the VIN system, there isn’t a VIN on the build plate. This matters to some parts suppliers that insist on a VIN, but there are usually other workarounds. If your Hiace was built for export or in a third country that uses the VIN system it might have a VIN and also might have GVM (Gross Vehicle Mass).

An example of a build plate and its decoding can be found here:
https://www.hiacesoutheast.com/vin-plates

Another useful resource for colour (in addition to that on Hiacesoutheast at: https://www.hiacesoutheast.com/paint-codes, which isn’t that comprehensive) is: https://hdpaintcode.com/snippet-c-ki0pgmbhaKvi.html. This latter site is much more comprehensive.
I’ve not found a list of trims, does anyone have one? Transmission and axle is described on Hiacesoutheast site. There is a list of Toyota plants on Wikipedia (here: https://en.wikipedia.org/wiki/List_of_Toyota_factories), but these don’t seem to cross-reference with the build plates).
It’s worth noting that the frame number is also stamped or embossed on the top of the RH wheel arch (under a pieces of plastic trim). This should obviously match the frame number on the build plate.


Manuals
Now you know your van I think the best starting point for further information is the ‘Resources’ part of the Hiacesoutheast site. There is a good timeline chart of models and components, fluids and capacities and a service schedule. On the site you can also find repair manuals for the RZH and LH engines and the 1KZ engines. There is also the best electrical manual I have found. It might not be exact to your particular van, but many of the other electrical manuals tend to be split into many, many page by page pdfs, whereas this is a single document.
As mentioned above lots of queries on here ask for manuals. If you carefully web search you will find lots of examples of owner’s manuals and other Toyota Repair Manuals. I don’t have a detailed list of repair manuals (RMs) but there are lots listed on eBay etc.

Many of the forum members on here have probably build up their own collection and folks are probably quite happy to share what they have. I’ve been the happy beneficiary from others and will send on my archive. It’s ~4GB and will be sent via a file transfer. If you pm me with an email address I’ll send you the lot. I won’t pick through it for a single document, I’m afraid. Unfortunately it is not possible to host these here. I’ve asked the folks at Hiacesoutheast if they want to host more but they have not for whatever reason.

I would caution about paying for manuals that might not arrive or downloading files that turn out to be dodgy.
Finally here, I know that some of the best manuals I have found contradict what I see when I look at my van so a good manual must always be treated with caution for specifications, dimensions and torque values for example.

Also:
• The RMs might not be to everyone’s taste if they are used to Haynes manuals etc, but as far as I know there is not a Haynes manual for the Hiace.
• Many of the major parts (engine, gearbox, axles) are shared with lots of other vehicles across Toyota and other Japanese manuals so manuals for these can also be useful.
• I don’t think that Hiaces are especially complicated vans, but seem a bit quirky compared to typical cars that I’m more used to working on. They are also bigger and heavier, too.

A link to an online owner's manual is in this post: https://hiace-super-custom.forumotion.com/t4575-model-equivalence-or-repair-manual-for-kzh106#25590


Parts
Now you know your van and have a reasonable understanding of how it works, you are probably wanting or needing to do some maintenance.

My starting point here is to plug the ‘model’ from the build plate into the Toyota Electronic Parts Catalogue (EPC). There are several regional and model variants for these. If you have a JDM Hiace Wagon, Hiace Custom or Hiace Super Custom build on the H100 platform (so ~1989 to 2006) then these are generally within the ‘Toyota Regius Ace’ section of the EPC. Don’t worry that the Regius Ace name was used for a different vehicle it is what these were, I think, called in Japan. The landing page is:

https://toyota.epc-data.com/regius_ace/

There are also pages for Japan, Europe, USA, etc, but these have fewer models
Selecting your exact model is a two-step process.

First select the frame name (KDH, KZH, LH, RZH, TRH etc) with the two- or three digit code (based on H100) and letter(s), (B, G, K, V etc), such as LH119V, KZH100G or RZH101G. The Hiacesoutheast site has a decent list of these models and what the codes mean (here: https://www.hiacesoutheast.com/hiace-info).

The second step is to select the second part of the model (eg ‘–RRMES’) from the build place that describes the option, such as ‘M’ is manual transmission and ‘P’ is auto. This should take you to a page where you can see the ‘catalog code’ (mine is 711140) and allows you to fill in the ‘Color code’ and ‘Trim code’, but I’ve no idea how useful these are to do.

This is also where the main areas of ‘Engine, fuel system and tools’, ‘Transmission and chassis’, ‘Body and interior’ and ‘Electrics’ are. It should be fairly self-explanatory from here with the following observations:
• Don’t rely on the pictures in the following sections (e.g. ‘11-07 – MOUNTING’ or ‘17-03 - AIR CLEANER’) to match what they look like on your van. The links are accurate but the pictures are not.
• Many sub-assemblies (eg ‘17-03 - AIR CLEANER’ (https://toyota.epc-data.com/regius_ace/lh119v/114894/engine/1703/) are further divided into several areas, here two illustrations.
• Many sub-assemblies (eg ‘19-04 - STARTER‘ (https://toyota.epc-data.com/regius_ace/lh119v/114894/engine/1904/) have several options, called ‘Schemes’, here there are five different starter motors types that were fitted to different engine types. I’ll expand on the numbering below.
• If your van does not have the assembly, eg mine does not have an auto gearbox then it will say ‘Chosen part group is not applicable for current complectation’ (whatever that means). If you are adamant your van does have this assembly then you will need to tailor the search accordingly (also more of this later).
• Any component with a bit of electrical add-on (such as some of the heating) is in the ‘Electrics’ section, while bits of the heating are elsewhere.
• I find the exploded diagrams really useful but it is also necessary to search across lots of areas for some jobs and these pages show parts not how to take things apart or put them back together, but for many jobs the exploded diagrams are actually more useful than a manual or you may need both. Your call.  

There’s also a ‘Best-selling parts for Regius Ace’ section.


So, to numbers.
I’m not an expert here. What follows is what I’ve gleaned. Toyota uses a two-part code for its part numbers, which is mostly helpful, but sometimes random.

On the starter motor page (https://toyota.epc-data.com/regius_ace/lh119v/114894/engine/1904) every starter motor is numbered 28100-. This is the parts number catalogue, sometimes called PNC or PNC#. Each starter motor then has a sub number, eg 28100-54210, 28100-54220, 28100-54250 and smaller sub-assemblies have related number so the starter-motor commutator is 28180- (or 28182-) and parts related to the commutator assembly are 28182-54230, -54410 etc. Similarly front disks (for my van) are 43512- with different examples being 43512-26100 and 43512-26130. This is all fine in theory since starter motors across the Toyota range are all (sort of) PNC 28100 and all front brakes are all (sort of) PNC 43512 but Toyota has often renumbered many of the major component areas and the EPC has not always been updated. This is apparent when digging further into the EPC, which then links through to the Amayama web site. For example the 2.7kW starter that I have is priced at $1343.24 on Amayama, but when you click on that part (https://www.amayama.com/en/part/toyota/2810054210, you can see it is out of production and replaced there by 28100-54130 (here: https://www.amayama.com/en/part/toyota/2810054130).

Several observations:
• Don’t buy ‘catalogue’ parts (such as starter-motors, shocks etc) from Japan or other international sites unless you absolutely have to. I can buy an equivalent starter motor (if they are in stock) from Autodoc for ~£200 or a local shop for ~£150. Your local parts supplier can be excellent here. How good they are may depend on how much information was coded into the systems they use when your vehicle was imported. I have some great local parts suppliers who stock some manufacturers but not others. You sometimes have to shop around anyhow as you are dependent on the ranges of manufacturers they deal with. Not every parts supplier deals with all manufacturers.
• The run around for changes in PNCs can be massively frustrating. See this thread for front disks as an example: https://hiace-super-custom.forumotion.com/t4369-help-with-locating-new-front-brake-disks-for-my-1991-lh119.
• Not everything has to be Toyota, but do not forget your helpful Toyota dealership. They are not necessarily more expensive and I’ve generally found mine to be great. They turned out to be considerable cheaper for front disks than the Brembo ones in the above post.
• Very many OEM parts for Toyota vehicles come from AISIN, Denso etc. If you buy these parts from Toyota they will still be AISIN, Denso etc, just in a Toyota bag.
• Autodoc (or other big sites with a good online catalogue) can be useful to cross-reference parts and numbers, but this isn’t always definitive and they are not always indicated to fit. I don’t think they have a good record for my particular van, but I’ve found them useful when I know I’m buying the right part.

As mentioned above the EPC works by filtering the model and option at the start of the process. The Amayama site works the other way round. On the Amayama site the H100 Hiace is called a Hiace though there are several variants. It has the same core component areas and also allows you to un-select options to widen the search across more models, which I find useful. It also has a lot of pictures of the more common parts, such as fuel filters, but again I can’t see why I’d buy something like a fuel filter (23303-64010) from Amayama (at ~£30), when I can get it from Autodoc for £10. I’d just add it to a pending order to bring the price over the free shipping limit or get it locally.

Amayama is great at responding to queries but there are of course plenty of other international sites such as:
MegaZip, eg:
https://www.megazip.net/zapchasti-dlya-avtomobilej/toyota/hiace-38414,  

JP-carparts, eg:
https://jp-carparts.com/toyota/cartypelist.php?maker=toyota&type=711140.

If anyone wants to send me further examples I’ll add them here.
https://partsouq.com/
Has been suggested, see: https://hiace-super-custom.forumotion.com/t4668-rear-shocks-for-95-hiace#26021

https://yoshiparts.com/
Has been suggested, see: https://hiace-super-custom.forumotion.com/t4489-headlight-options-sc#26595

Some parts are unique to Hiaces and some are unique to a particular model. This means that getting parts can be almost impossible as they were made for a small range of vehicles and often a long time ago. In these cases breakers or scrap yards or ‘pull-a-part’ places might be the only option. Fortunately these also exist in Japan and have good online stores. I’ve not used them, but again I’ll add links here if I get them.

Right that’s enough for now!

HTH!


Last edited by LH119V on Mon Feb 26, 2024 9:06 pm; edited 8 times in total (Reason for editing : wiring updated, parts and manuals. Owner's manual thread added. R12 sticker added. further posts, added fridge, added yoshiparts)

Dandy1972, Andonic, LH107_3L_engine_4WD, g00se, Gonewild and ozzymoron like this post

Back to top Go down
parxuk
Not so new now
Not so new now


Number of posts : 48
Home City : Bristol
Registration date : 2021-05-03

My LH119 Empty
PostSubject: Re: My LH119   My LH119 Icon_minitimeMon Apr 25, 2022 9:45 pm

Looks great. How's the pop top after 30 years?

Would love to see some pictures of the setup inside.

What do you plan on doing for the 30y refresh?

My 4WD button doent light up on the dash, but I can here the actuator activating when I press the button and it definitly drivers different with the hubs locked and in 4WD. Does your dash button still light?
Back to top Go down
AgathaAlice
Im not old...just experienced


Number of posts : 350
Age : 70
Home City : Hamilton New Zealand
Model and year : As of August 1st 2022 we no longer have a Toyota.
Registration date : 2018-08-31

My LH119 Empty
PostSubject: Re: My LH119   My LH119 Icon_minitimeWed Apr 27, 2022 8:17 am

Most of those Toyota switches can be dismantled readily to change any bulb inside. Pull it out and have a look.

LH119V likes this post

Back to top Go down
parxuk
Not so new now
Not so new now


Number of posts : 48
Home City : Bristol
Registration date : 2021-05-03

My LH119 Empty
PostSubject: Re: My LH119   My LH119 Icon_minitimeWed Apr 27, 2022 12:44 pm

AgathaAlice wrote:
Most of those Toyota switches can be dismantled readily to change any bulb inside. Pull it out and have a look.

Thanks for the head-up. I pulled the 2 dash switches for the 4WD and rear demisster. Tested the bulb on the 4WD and no continuity, so presumably a duff bulb. Tested the one on the demister (I knew this was working anyway as the switch lights). Swapped the bulb but still no joy, so presume an issue somewhere with the 4WD system? Car definitly drives different with front hubs locked and then 4WD button depressed, but maybe something isnt right somewhere? Tried to do some googling, but i'm not mechanically minded enough to understand what was being stated (actuators, pumps etc). I know there is a sound made when I press the button and the car defo drivers different in 4WD mode.

LH119V - sorry for thread hijack.
Back to top Go down
Merlin_
Not so new now
Not so new now
Merlin_


Number of posts : 76
Home City : Nelson BC
Model and year : 92 Hiace 4x4 Diesel Cruising Cabin
99 Tercel ce *mint*
00 Tacoma *loved and now lost, sold to buy my van!*
Registration date : 2012-11-26

My LH119 Empty
PostSubject: Re: My LH119   My LH119 Icon_minitimeWed Apr 27, 2022 6:14 pm

I have the same van! Also trouble with a couple of the dash switches not lighting up, I did not know you could change out the bulb!
Back to top Go down
https://www.youtube.com/user/mjr760
LH119V
Hiace Master
Hiace Master


Number of posts : 510
Home City : p
Registration date : 2021-04-13

My LH119 Empty
PostSubject: Re: My LH119   My LH119 Icon_minitimeWed Apr 27, 2022 6:37 pm

Hello.

The pop-top is tip-top. It's in fab condition regardless of its age. Very pleased with that!

The inside is basically the same as the van featured in the OttoEx YT video:


Subtle differences are that, on mine:
The cabinet at the front of the sliding door is a little smaller.
There are two 'ice cream' hatches along the long cabinet rather than one (over the RH real wheel arch).
I don't have external electrical hook up nor solar (yet).
The additional cushion for the bed uses two legs rather than folding ones. Will be changing this so it can act as an external seat.
I have additional seatbelts.
Mine's a manual.
Mine's more rusty (for now).

At the moment it's a fairly empty van on stands, though!
My LH119 2022-021

Plan is to make it ready for another 30y!

I can't remember if the switch lights up when the 4x4 is activated but I get a green 4x4 light in the instruments. If you don't get that then I'd check the bulb in the clocks.

The van should only go into low range when 4wd is properly engaged, at least within the gearbox. Low range does not require confirmatory 4wd lights etc, but the dash light does confirm that 4wd is engaged. I don't know about autos but on M/T the dash light is triggered by a gearbox/transfer sensor that has continuity when the vacuum actuator triggers 4wd and a dowel or something similar presses the sensor in. The sensor or its wiring is another point of the failure. It's easy to test but quite hard to get at!

The sensor and its wire are on this picture here (between the H/L actuator lever and the rear engine mount bolt holes):
My LH119 2022-020

Gearbox is out to replace clutch. The friction plate only had 0.2mm of life left so a perfect time to replace it before it starts to chew into the flywheel!

HTH

Andonic likes this post

Back to top Go down
LH119V
Hiace Master
Hiace Master


Number of posts : 510
Home City : p
Registration date : 2021-04-13

My LH119 Empty
PostSubject: Re: My LH119   My LH119 Icon_minitimeMon May 02, 2022 6:59 pm

Right, interesting.

My manual seems to suggest that when pressing the 4WD button the only light to come on is in the combination meter, see:
My LH119 Pictur12

However when I look at the switch I see that there’s a lamp in the switch as others have said above. The manual shows the 4WD switch should be illuminated across pins 2 and 3. There’s also a lamp in the hazard switch, too and these are indeed replaceable. See this hi-res snap:
My LH119 2022-022

Also, on my van they are both not working.

They seem to have ‘V-2’ and ‘TSD 1’ or ‘TSD 13’ on their base.

Sadly this Wikipedia page doesn’t directly list them:
https://en.wikipedia.org/wiki/List_of_automotive_light_bulb_types#Group_2

I also don’t know if they are just replaceable T1.4W or T5 (also 1.4W) in a special shallow base or if they have another number? Any ideas?

This might be useful:


Oh and this:


Or are they these (for LED replacement):
https://www.auto-leds.co.uk/epages/es694511.sf/en_GB/?ObjectID=37069327&ViewAction=ViewFaceted&FacetValue_CategoryID=37069327

I’ve no idea.

Thoughts?

Edit. Found the Toyota part for the lamp: https://www.amayama.com/en/part/toyota/8499910320

On here: https://toyota.epc-data.com/regius_ace/lh119v/114894/electric/8401/83650/

Site also points to the version without the base. In my various lamp replacement journey I've now run out of these, but haven't seen the type with the flat base before.
Back to top Go down
AgathaAlice
Im not old...just experienced


Number of posts : 350
Age : 70
Home City : Hamilton New Zealand
Model and year : As of August 1st 2022 we no longer have a Toyota.
Registration date : 2018-08-31

My LH119 Empty
PostSubject: Re: My LH119   My LH119 Icon_minitimeTue May 03, 2022 6:59 am

Re-use the grey bit that locks into the switch, just replace the bulb itself, you should be able to find suitable 12 volt bulbs with wire leads at any electronics store. Just thread the wires through the little holder piece the same as the original. Do check the old ones with a meter before replacing in case they're actually OK and there's something else stopping them from working.
The 4WD one probably is just illuminated when the vehicle lights are on, so you can find it in the dark not to indicate when the function is selected and as you stated the indicator in the combination meter will show when it's selected. The hazard one will surely only come on with the vehicle lights.

LH119V likes this post

Back to top Go down
parxuk
Not so new now
Not so new now


Number of posts : 48
Home City : Bristol
Registration date : 2021-05-03

My LH119 Empty
PostSubject: Re: My LH119   My LH119 Icon_minitimeWed May 04, 2022 1:30 pm

Have tried swapping bulbs and using a known good one, but unfortunately still no light on the 4wd switch even with the headlights etc switched on so think there must be a fault with the system somehwere. A quick Google shows others with same issue.

LH119v - where did you get the fault finding page you referenced? If you source any spare bulbs please let us know where you got them from. I have tried local Toyota specialist but no luck.

EDIT - sorry, I was chatting rubbish. I hadn't driven the van in the dark with the lights on since swapping the bulb. Just tried it and pleased to say the switch does illuminate green when the headlights are on as AgathaALice correctly stated (thanks for the tip, saved me a trip to the mechanic!). Now just need to source a replacement bulb for the demister.

My LH119 Pxl_2010

LH119V likes this post

Back to top Go down
parxuk
Not so new now
Not so new now


Number of posts : 48
Home City : Bristol
Registration date : 2021-05-03

My LH119 Empty
PostSubject: Re: My LH119   My LH119 Icon_minitimeThu May 05, 2022 10:21 pm

LH 119v. Hopefully the part number you found for the bulb (8499910320) will be the correct one. I contacted my local Toyota dealer and they can get them in at £6 each. I have ordered one to pick up on Saturday. I will let you know how I get on.

Big day for the van on Saturday as also getting timing belt kit fitted, new v belts, power steering belt and water pump.

LH119V likes this post

Back to top Go down
AgathaAlice
Im not old...just experienced


Number of posts : 350
Age : 70
Home City : Hamilton New Zealand
Model and year : As of August 1st 2022 we no longer have a Toyota.
Registration date : 2018-08-31

My LH119 Empty
PostSubject: Re: My LH119   My LH119 Icon_minitimeFri May 06, 2022 8:01 am

You should have access to RS components, these are what I'd use:

https://uk.rs-online.com/web/p/incandescent-light-bulbs/6559198

as I said these can be fitted into the grey holder seen in the pics above by just unfolding the old wires and duplicating with the new ones.
Way cheaper than your Toyota price. May not be quite as bright at 0.72 watts but I don't know what wattage the originals are.

LH119V likes this post

Back to top Go down
LH119V
Hiace Master
Hiace Master


Number of posts : 510
Home City : p
Registration date : 2021-04-13

My LH119 Empty
PostSubject: Re: My LH119   My LH119 Icon_minitimeFri May 06, 2022 9:09 pm

Thanks, both.

Will try to answer or comment on the posts above.

Yep, it makes perfect sense for the switch to be illuminated with the vehicle lights, to assist with locating the switch in the dark. Many of my dash lamps were or are not workinig. See below for a comment on a switch with two lamps, too.

Will check and see if it’s possible to remove the lamp from the holder. Have done this with the T5-type lamps in the past on other cars.

Thanks also for the RS link. I have an account with them but rarely buy from them. RS is one of the most expensive ways of buying commodity parts, but they are always top notch. I see them as a sort of European equivalent of McMaster-Carr. It’s always worth looking up parts in their catalogue, see:

https://www.mcmaster.com/

It’s usually then possible to cross-reference the parts to other sites. I’ve done this for the filters I’ll be adding to the coolant loop (to protect the re-cored heater matrix) but more of that later.

Interesting that a lamp from RS is ~£1 and Toyota sell their part for ~£6. Interested to know if 8499910320 is correct and whether the packaging etc mentions power consumption.

Nearly last point on lamps is that I’m looking to a couple of companies to do an entire lamp swap to LEDs. I know there are pros and cons and swapping some might not be easy or possible but hoping one of them can put together a full, or best case kit for me. More of this later. Good point about the wattage. There seems to be a range of power use for these lamps and I’ve not found a specification for the Toyota part. I might be able to find one that works and test its consumption.

Last point on lamps and switches for now is that I’ve been looking to buy an on/off or momentary dash switch to enable dash switching for my diesel heater. Part of its wiring features a brown and white pair that will cycle the heater on or off (through its correct start up or shut off procedures). This means you can turn the heater on (also when it draws its 10A start up load) while driving and also allows you to keep the heater running while driving off then stopping it. I’m not talking about driving around with it running, but like the option of having this control. Anyway, here’s a couple if pictures:

My LH119 S-l16011
My LH119 S-l16010
My LH119 S-l16012
My LH119 S-l16013

and interestingly it has two built in lamps. I presume one is illuminated with the vehicle lights and one is activated with the switching circuit. Sadly none of the ones I’ve found so far have the wiring socket, which I’d need to wire it in properly so it remains just a wish.

The fault finding page came in an electronic manual from ‘Andonic’ who has had the yellow CC that’s on here. It comprised a Hiace Owner’s Manual and a load of repair manuals. This one is taken from RM156E. It’s not perfect as a number of torque and resistance values are seemingly wrong but it’s not a bad place to start. It’s just one of many of the manuals I’ve acquired. If you want a copy then pm him or me and one of us can try to send it. It’s ~160MB.

Very best wishes for the work you're doing this weekend.

These Sealey AS5000M stands arrived recently and I’ll be installing them to support the rear of my van.
My LH119 2022-023

It’s currently on axle stands (underneath the axle), but I want to do some work on the rear suspension so need to support on the frame instead and let the anxle sag down.

Fortunately I managed to get the rear drums off and for once I seem to have found a part of the van that doesn’t immediately need fixing. See:
My LH119 2022-025
My LH119 2022-024
My LH119 2022-026
My LH119 2022-027

Here's another example of how the RM156E publication is wrong. It states the maximum drum diameter is 272mm though the drum itself is labelled 297mm so hmmm.

As ever the Timmy The Toolman YT videos are really useful for Hiaces.

https://www.youtube.com/c/TimmyTheToolman

While i've not seen him working on a Hiace many Toyotas are really similar and I needed a steer on how to wind in the rear shoes

More on the suspension work later.

Cheers.
Back to top Go down
AgathaAlice
Im not old...just experienced


Number of posts : 350
Age : 70
Home City : Hamilton New Zealand
Model and year : As of August 1st 2022 we no longer have a Toyota.
Registration date : 2018-08-31

My LH119 Empty
PostSubject: Re: My LH119   My LH119 Icon_minitimeSat May 07, 2022 7:25 am

That RS price was for a pack of ten pieces, not just one!
Yes I think they're lower wattage but at the price it's worth trying to see if they're bright enough. It's easy to remove the lamp from the holder, the wires are just wound around the slots in that grey base part.
LED is surely the way to go nowadays, if you're doing the whole van you'll need to replace the direction blinker flasher unit with an electronic one and watch out that the light patterns from the replacements for all the lamps are not different enough from the originals to fail your vehicle inspection. Headlamps probably can't be replaced by LED's anyway, and remember that LED's slowly diminish in output over time while filament lamps are more consistent until they fail completely.
Edit: show us a picture of the connector end of that heater switch.

LH119V likes this post

Back to top Go down
parxuk
Not so new now
Not so new now


Number of posts : 48
Home City : Bristol
Registration date : 2021-05-03

My LH119 Empty
PostSubject: Re: My LH119   My LH119 Icon_minitimeSat May 07, 2022 12:35 pm

For info the replacement bulb part number 8499910320 is correct. Yay! Now all my dash switch lights work.
Thanks for help/part numbers.

Back to top Go down
LH119V
Hiace Master
Hiace Master


Number of posts : 510
Home City : p
Registration date : 2021-04-13

My LH119 Empty
PostSubject: Engine cooling, etc.   My LH119 Icon_minitimeSun May 08, 2022 10:04 pm

Engine cooling, etc.

Intro
I’ve posted a few pieces and pictures in various places on engine cooling but as this seems to be a common theme on Hiaces I’m going to bring these together here so can hopefully ‘post once refer to often’ given the inevitable complications and updates. If I’d recorded all this in video it would make a decent YT video, but I didn’t. Instead I have taken lots of pictures, so standby.

When I bought my van I knew the cooling system had been rather neglected. While the service history showed several ‘engine and radiator flushes’ there was obviously a lot of sludge in the system. The expansion bottle was half full of it and the coolant liquid only had a homeopathic quantity of anti-freeze. There was also evidence of a past overheat in that large areas of the engine bay had been sprayed with orange sludge. Nevertheless the engine pulls well and I’ve not had an overheat since but this clearly needed sorting and it’s been quite a bit job.

Here’s a couple of pictures of the ‘spray tan’:
My LH119 2021-073

My LH119 2021-074

Resources
Firstly, if you are reading this and scratching your head about how your cooling system works and like everyone don’t have a manual then head over to the Toyota Electronic Parts Catalogue (EPC) site, see:

https://toyota.epc-data.com/regius_ace/lh119v/114894/?color=9D4&trim=PB11

This is for my van, you can see the model codes in the first post above but the relevant bits here are that it’s a 3L engine, 5-speed manual transmission, has front and rear heaters; two heater matrixes, one in the dash and one in the RH rear (opposite the sliding door). Also, it has two air-conditioning units. One is linked with the front heater, so it’s really a HVAC unit. The second one for the rear in the roof panel just behind the front seats.

In the highly unlikely event that you have exactly the same van then the above link will be fine, but in the almost certainty that your van is different (auto), different engine, etc, etc then tailor the model code in the EPC catalogue to your exact van based on the VIN plate. As an aside if you, like me have a Japanese van of this era that were meant for their domestic market then this isn’t a true 17-digit VIN. Anyway tailoring the EPC link to your model codes will help loads.

The next thing to realise is that even with this narrowed down to your exact model code many of the systems, such as air-con have several schemes that can vary quite widely but it should be obvious which one you have.

How it works
You should now know what sort of cooling / HVAC system you have but how does it work. I’m not teaching anyone to suck eggs here, but it’s important to realise that the system is mulit-staged.

As I understand it, on start-up the coolant is pumped around the engine galleries in the engine block and through the heater matrix or matrixes by the water pump (the pump is driven by auxiliary belt(s) rather than the main timing belt, so it’s necessary to keep these good, but it’s probably worth changing the pump when doing the main timing belt as it’s quite difficult to access). It’s normal to have the heaters connected in this primary loop as it warms the occupants etc up quickly and in the coldest conditions this is all that’s involved. The other point to consider is that if you have removed the rear matrix then I think it’s probably best to cap this off as close to where the pipes T off to the rear as possible. You don’t want pressured and potentially failure-point hoses that don’t go anywhere.

If the heat output of the engine is greater than removed by the heater(s) them the thermostat will warm to a point when it opens. There’s also a small hole in most thermostat valves so there’s always a little flow through them to prevent them being surrounded by cool coolant without opening. Flow through the thermostat and into the radiator via the big top hose with return via the bottom hose is the secondary loop. When combined with airflow from movement this is generally enough to keep the system heat dissipation in balance with that produced, especially if it’s cold outside and heat is also being diverted inside via the heater(s).

On most vehicles, especially newer ones the third stage is to use electronic fans on the radiator to assist with the air flow, either in traffic or other times when more heat builds up than is dissipated. I have a VW that has two electronic fans that come on at different temperatures, so it has 4 stages.

Older Toyotas have a mechanical fan, but unlike very old cars where the fan is constantly driven (usually by a belt) here there’s a viscous coupling that gets progressively more coupled with greater heat. It’s driven all the time but it should spin freely when cold (so robbing less power than if always driven). There’s a bi-metallic strip that changes various internal oil port alignments and results in less slippage when warm. Quite clever really but when they fail they usually are coupled when cold and slip more when warm, which is not what you want. There are loads of YT videos on these if you suspect a problem.

Final few points to mention are that the system is pressurised which raises the boiling point of the coolant. The pressure of the system should be stamped on the radiator cap. If you have coolant loss around the cap then there might be over pressurisation (possibly head gasket), but it might just be a weakened spring in the cap, or muck or corrosion at the seal. Many modern vehicles have a fully pressurised system but my Hiace has an unpressurised expansion tank.

What I've done
So, the first thing I decided to do was drain and flush and back flush the system.

Here’s where the manual says are the drains:
My LH119 2021-077

But it’s wrong. The radiator drain is on the RHS, well mine is.

The engine drain is tricky to find. See:
My LH119 2021-087

It’s also hard to remove as it’s sealed with Loctite, Don’t forget this when putting back.

Here’s an example of the sludge I got out of the expansion bottle
My LH119 2021-076

and here’s the expansion tank in my untrasonic cleaner:
My LH119 2021-086

Actually, and here’s a top tip the best way I’ve found to clean any sort of plastic tank that’s impossible to easily get inside is to chuck in a handful of small pea gravel and some fairly liquid or other detergent then shake it about madly after plugging the openings with finger, thumbs etc. Do this a few times and it’ll either be cracked and useless (don’t blame me) or it’ll be beautifully clean. It beats any other method I’ve ever come across and will also keep you fit.

This shows how bunged up the thermostat housing was. It shows just how bad everything was:
My LH119 2021-079

Here’s a few pictures of the flush / backflush process and a picture of what came out:
My LH119 2021-080

My LH119 2021-082

My LH119 2021-081

My LH119 2021-088

This was as good as I could do with everything in situ and it got out so much gunk but I was still concerned about the state of the radiator and that worrying brawn stain halfway down and at its base:
My LH119 2021-083

So I decided to remove it and this is when I found it had definitely been leaking:
My LH119 2021-084

My LH119 2021-085

It’s also likely that it’s the original part. It is a Toyota one.

Anyway, this put me on a quest to find a replacement and I’ve searched all over the web. Options seemed to be ~£700+ for an OEM one. Similar price for aftermarket aluminium. ~£3-500 for aftermarket catalogue part, but getting sufficient details to know whether this would be an equivalent copper and brass one (like OEM) or a fairly poor aluminium one with plastic ends was very difficult and the fit into the vehicle is very tight as anyone who has removed a Hiace radiator knows well.

In the end I got the original one re-cored and am very pleased that I did this, but it’s not all been plain sailing.

Here’s a picture that shows the cores were still blocked:
My LH119 Old_co11

And here’s some pictures of how far they tear into the radiator and some of the rebuild process:
My LH119 Old_co12

My LH119 New_0110

My LH119 New_0210

My LH119 New_0310

My LH119 New_0410

My LH119 New_0510

One of the main things to notice is that they were able to fit a three-layer core where the original one was a two-layer. This should give better cooling than originally. Will see.

Sadly one of the brass pipes received a knock when it was being sent back, see:
My LH119 2021-126

and I’ve had to repair this. I had to reform the pipe around a socket and then float plumbing solder over the crack. This seemed to be the best fix I could achieve and seems fine after filing off the excess.

My LH119 2021-128

My LH119 2021-127

I’ll have to be careful when connecting the hose here.


Front Unit
I’ve also decided to get the front heater matrix re-cored. Again I have been able to get a lot of muck out but it’ll be interesting to get the inside pictures when it’s being repaired. If they say it’s fine and clear then I’ll know my cleaning routine works.

Another part of the rationale is that I’ve not been able to find a replacement front heater matrix. While it seems okay, see:
My LH119 2022-028

It is fairly exposed to damp etc in the airflow so it might be worse that I’ve been able to view and the last thing I want to do is have to pull out the dash and heater box if it leaks in a few month’s time as it’s a huge and complicated job.
It seems that this front matrix is actually two units together:
My LH119 2022-030

My LH119 2022-029

No idea how they seal this.

I’ve been warned that the re-core process will mean it’ll look a bit different as the corrugated edge band will be replaced by a C-channel that’ll extend a few mm over the edge of the core. I still have to get the cushioning foam to seal it into the heater box but will wait for its return.


Rear Unit
Here’s a sort of exploded picture of the rear heater system:
My LH119 2021-129

My LH119 2021-130

There's also a fan in the shroud and all sorts of ducting below the matrix into the cabin. There’s also a cable that connects the heater heat slider to the valve. I’ve not yet decided how much of the piping to replace. Much of the metal type looks ready for replacement and I might make this in copper with suitable clamps or replace lengths for flexible hose. Not shown is the various lengths that extend back from the engine and cross to the RHS underneath. This can all be seen in the various EPC links

Whether I send off this matrix for a re-core will depend on the report from the front one.

Filters in the cooling system
Anyone who has fixed up a neglected system will know that there’s sludge you can get at and sludge you cannot.

I cannot get at various parts of the engine and pipes and I don’t know whether additional flushing will have much of an effect. I think what needs to happen is to drive the van, for it to go through its heating and cooling cycle; plus with improved flow, due to a new pump and better radiators, bits are likely to get dislodged with vibration.

In the outback it’s apparently common to stick the toe of an old sock over the top hose where it comes out of the thermostat or goes into the radiator to stop the muck gumming things up. It’s now possible to fit a high flow filter in the radiator top hose to keep the worst of the muck out of there. With these, I think it’s necessary to clean them out fairly frequently, but this is easier to do than the radiator. They usually have clear sides so you can see how they are. After a while it might not be necessary if all the available crud has been removed.

I’ve also been researching hi flow filters to go upstream of the heater matrices. I’ve got a few in mind, but not chosen anything.


Well that’s all for now. Will update as things change.

Cheers!

toldsimply, Egoloss, kazumi_the_hiace and Gonewild like this post

Back to top Go down
LH119V
Hiace Master
Hiace Master


Number of posts : 510
Home City : p
Registration date : 2021-04-13

My LH119 Empty
PostSubject: Re: My LH119   My LH119 Icon_minitimeTue May 24, 2022 9:13 pm

AgathaAlice wrote:
That RS price was for a pack of ten pieces, not just one!
Yes I think they're lower wattage but at the price it's worth trying to see if they're bright enough. It's easy to remove the lamp from the holder, the wires are just wound around the slots in that grey base part.
LED is surely the way to go nowadays, if you're doing the whole van you'll need to replace the direction blinker flasher unit with an electronic one and watch out that the light patterns from the replacements for all the lamps are not different enough from the originals to fail your vehicle inspection. Headlamps probably can't be replaced by LED's anyway, and remember that LED's slowly diminish in output over time while filament lamps are more consistent until they fail completely.
Edit: show us a picture of the connector end of that heater switch.

Hi there.

Sadly the seller of that switch didn't include a picture of the rear electrical connector part, but another seller of the same switch does. It's here, but not a great snap:
My LH119 S-l16015

I think I can be confident it's the same thing as it has the same number '153337' on its side, see:
My LH119 S-l16014

It also looks the same from the front, which I've not shown. The seller showing the rear picture also doesn't have the connector; I asked.

Are you thinking I can identify the socket from the electrical manual(s)?

It might just work...   cheers

LH107_3L_engine_4WD likes this post

Back to top Go down
AgathaAlice
Im not old...just experienced


Number of posts : 350
Age : 70
Home City : Hamilton New Zealand
Model and year : As of August 1st 2022 we no longer have a Toyota.
Registration date : 2018-08-31

My LH119 Empty
PostSubject: Re: My LH119   My LH119 Icon_minitimeWed May 25, 2022 6:21 am

Yes that's what I had in mind.
Back to top Go down
AgathaAlice
Im not old...just experienced


Number of posts : 350
Age : 70
Home City : Hamilton New Zealand
Model and year : As of August 1st 2022 we no longer have a Toyota.
Registration date : 2018-08-31

My LH119 Empty
PostSubject: Re: My LH119   My LH119 Icon_minitimeThu May 26, 2022 7:23 am

I'm unsure, do you actually have one of those switches? If so can you take it to a wrecker and see if you can match up a plug on the wiring loom of a wreck then get them to cut it off with enough wire left on it to be easily connected to? Otherwise maybe a visit to a wrecker would give you the switch and the connector? Do you know a Toyota model number of a vehicle that came with one as factory standard?
You don't give your location, I assume it's not NZ, we have some very good wreckers here that could probably help.
Another thought is to take a switch to some auto-sparkie places and see if they have any connectors in their junk boxes that would fit.

LH119V likes this post

Back to top Go down
LH119V
Hiace Master
Hiace Master


Number of posts : 510
Home City : p
Registration date : 2021-04-13

My LH119 Empty
PostSubject: Re: My LH119   My LH119 Icon_minitimeWed Jun 01, 2022 8:56 pm

Hello.

No, I don’t currently have one of the switches.

Yes, if I did I could possibly take it to a breaker’s yard. Around here though Hiaces are rarer than rocking horse poo so it’s unlikely that there will be anything unless ‘generic Toyota’ fits. I might be better speaking to the Toyota dealer if they can identify a suitable socket and then just get it, but yes, something from a breaker’s yard would probably need less wiring / pinning work.

I was hoping to buy the switch and the socket together but that doesn’t seem to be how these eBay sellers, at least, operate. I think they are selling switches as replacement items and possibly wiring looms as separate items of just scrapping the wiring with the shell.

The pictures for the ‘power heater switches’ I posted above came either from a 2002 or 2010 Toyota Hiace based on the advert blurb.

The auto-sparky route is also good. I’ll make some enquiries and also try to identify anythig in the online EPC.

Cheers!

LH107_3L_engine_4WD likes this post

Back to top Go down
LH107_3L_engine_4WD
New Member
New Member


Number of posts : 19
Home City : Bangkok
Model and year : 1990 hiace super custom limited Q-LH107Q
Registration date : 2022-07-07

My LH119 Empty
PostSubject: Re: My LH119   My LH119 Icon_minitimeThu Jul 21, 2022 5:46 pm

Could you take pictures about mounting on steering pump please. My van has problem with this mounting pump. Thank you
Back to top Go down
LH119V
Hiace Master
Hiace Master


Number of posts : 510
Home City : p
Registration date : 2021-04-13

My LH119 Empty
PostSubject: Re: My LH119   My LH119 Icon_minitimeThu Jul 21, 2022 7:26 pm

Hello, 'LH107_3L_engine_4WD'

I saw your pm to me on the left engine mounting and am wondering if you have an alignment issue as a result?

Almost all of the front items of my 3L engine are removed. This is the area from the radiator through to the timing belt cover (inclusive), so all the pulleys, idlers, belts, brackets and the driven items (PS, A/C, alternator, fan and coupler) are out so I’m not really able to help except to say there should be ‘decent’ clearance between the rear of the radiator fan and the top hose bracket, but don’t have a dimension.

Here are a couple of pictures of the PS lower bracket mount and the PS bits (in a box), sorry:
My LH119 2022-069

My LH119 2022-068

From your pictures in the pm, it seems that your engine is a bit too far forward or something is mis-aligned due to that LH bracket. It’s not easy to get a decent picture, but here are a couple from mine:
My LH119 2022-071

My LH119 2022-070

I’ve never undone either the left or right engine mounts and I don’t quite know how they are arranged as they are quite hard to see through their covers.

The EPC link for the mounts for my van is here:
https://toyota.epc-data.com/regius_ace/lh119v/114894/engine/1107/

Have you asked your mechanic why he added the plate and can it me removed?

I presume it's essential to support the engine on a jack etc if you undo anything.

I currently do have the rear engine mount removed. On my van, a manual, the rear engine mount is really a transmission mount and it is bolted directly to the top of the gearbox. There’s then a bracket around the rear engine mount that locates this in 3 dimensions. I presume your rear engine mount is somewhat similar so it might be worth taking a look there to see if it’s correctly aligned or deviated. As I understand it the engine and transmission assembly is supported on these three, so distortion of the rear may indicate if there is mis-alignment?

There are a few threads on here where people have asked and posted about replacing the main engine mounts and I’d do a Forum search (I know it’s not that great to search) to see about these. I’ve replied to some of these and posted a few pictures of the rear mount so also try a search with my username.

Sorry I can’t offer more and HTH.

LH107_3L_engine_4WD likes this post

Back to top Go down
LH107_3L_engine_4WD
New Member
New Member


Number of posts : 19
Home City : Bangkok
Model and year : 1990 hiace super custom limited Q-LH107Q
Registration date : 2022-07-07

My LH119 Empty
PostSubject: Re: My LH119   My LH119 Icon_minitimeMon Jul 25, 2022 3:06 am

Thank you for your help. I thought i found the cause because you‚ Thank you very much. My mounting PS pump is not mymodel and I do not know what model of that mount. I have some question , you picture did not show about adjusting strut belt (44446)of PS pump and crack pulley. Did you have it? if yes i will find store to buy it.
Thank you.
Regards.
My LH119 Img_2010
Back to top Go down
LH119V
Hiace Master
Hiace Master


Number of posts : 510
Home City : p
Registration date : 2021-04-13

My LH119 Empty
PostSubject: Re: My LH119   My LH119 Icon_minitimeTue Jul 26, 2022 2:38 pm

Hello.

Glad to help.

Yes, the PS pump has that bracket to hold tension on the belt. Pictures:
My LH119 2022-074

My LH119 2022-075

If the bracket is missing you might also need to replace the two bolts; numbers on the EPC and also on my bag in the picture so don’t forget this in your ordering if necessary. They are a M10 fine thread flange-head bolt, so don’t have to be a specific Toyota part. A standard fine thread bolt or machine screw would be fine with a washer. I damaged one removing the bracket so will be getting a replacement.

Cheers!

LH107_3L_engine_4WD likes this post

Back to top Go down
LH107_3L_engine_4WD
New Member
New Member


Number of posts : 19
Home City : Bangkok
Model and year : 1990 hiace super custom limited Q-LH107Q
Registration date : 2022-07-07

My LH119 Empty
PostSubject: Re: My LH119   My LH119 Icon_minitimeSun Jul 31, 2022 4:30 pm

Thank you very much cheers, I found some problem about miss-alignment engine that this mounting of power steering pump (it is wrong model.) after i change for real model but miss-alignment engine is still. I do not have any idea to fix it. Did you have suggestion for me?
Thank you.
Regards.


Sorn.
Back to top Go down
LH119V
Hiace Master
Hiace Master


Number of posts : 510
Home City : p
Registration date : 2021-04-13

My LH119 Empty
PostSubject: Re: My LH119   My LH119 Icon_minitimeMon Aug 01, 2022 7:43 pm

Hello.

Hopefully you can get the correct PS pump and that will help with the belt alignment. The EPC will help but I expect it’s not a part made by Toyota, probably DENSO so once you have the part number (from the EPC) cross reference with your local physical or online stores etc. There will be lots of non-OEM equivalents.

I’ve no idea how to fix the misalignment issue. I’ve never taken out a Hiace engine and not undone the main mounts, as I wrote above.

The first thing I’d ask about is why the additional plate was added to the LH mount and whether it needs to be there and can it be removed? You need to ask the person who made the change. Failing this you might ‘just’ need to replace the LH engine mount but I’ve no experience of this.

In order to ask the wider community I suggest starting a new thread. Replying here won’t be seen by many. There are also a few posts across the Forum on replacing the engine mounts so these might be helpful. I know it’s not easy to search the Forum but after creating your own post (sorry I don’t know if you have done this) then a search is your best bet.

Cheers.

LH107_3L_engine_4WD likes this post

Back to top Go down
Sponsored content


My LH119 Empty
PostSubject: Re: My LH119   My LH119 Icon_minitime

Back to top Go down
 
My LH119
Back to top 
Page 1 of 2Go to page : 1, 2  Next

Permissions in this forum:You cannot reply to topics in this forum
Toyota Hiace Super Custom Owners Forum  :: Pictures Of your Hiace :: Show Us Yours !-
Jump to: