Number of posts : 884 Age : 77 Home City : Hervey Bay Qld Model and year : 1994 sc Registration date : 2008-08-15
Subject: Re: MNC - Updated 16/02/2019 Sun Dec 05, 2010 6:42 pm
Like vantce said Looking good....
MNC Been here a while
Number of posts : 120 Home City : Wellington, New Zealand Model and year : 1997 SCG 3LDT KZH100G Registration date : 2009-09-21
Subject: Re: MNC - Updated 16/02/2019 Mon Dec 06, 2010 9:59 am
AussieQ wrote:
Like vantce said Looking good....
Hey guys,
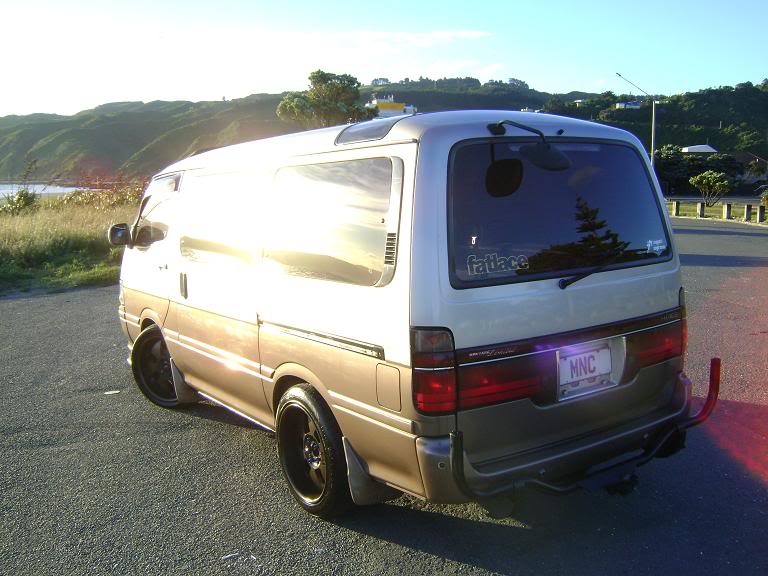
cheers for the comments. at the mo theyre just sitting round home collecting dust and leaves lol.
I semi did some work on the kit i want to use, so far just the front lip is on. couldnt wait to paint it the same as the van but i really like the satin black so will do the rest of the kit like it lol, kinda looks tough imo.... what you guys think?
by the way, any of you guys know if whiteline make suspension stuff for our vans? was thinking of thicker sway bars but mines apparently got the thickest factory made item being 25mm....
MNC Been here a while
Number of posts : 120 Home City : Wellington, New Zealand Model and year : 1997 SCG 3LDT KZH100G Registration date : 2009-09-21
Subject: Re: MNC - Updated 16/02/2019 Wed Dec 08, 2010 4:25 am
Well another quick update......
Wanting a chrome grill fror the van for a while and had been looking for one with no luck...after reading on here somewhere that there was chrome underneath the factory item, it got me thinking. SO....this is how i went....
Tested a bit of paint stripper on a little section to confirm this finding......and what ya know....bingo!
Knowing that there was bling under there somewhere, i quickly got to work.....
Pulled the corner lamps out and started brushing on the paint stripper.....Please note that the corner lamps are plastic so it pays to either be really carefull when applying the stripper or mask it up.
Leave the stripper on there for a good 5-10 minutes or as instructed till the paint bubbles and lifts from the chrome
When ready to wipe it off, i used hot soapy water (washing detergent) and a good bristled brush. You wont get it all off in one go so just repeat the process.
Once you have most of it off, use autosol and a rag to take off any blemishes and shine it up.
Before
After.....BLING! lol
AussieQ Hiace Master
Number of posts : 884 Age : 77 Home City : Hervey Bay Qld Model and year : 1994 sc Registration date : 2008-08-15
yeah big diff, i hope the thread helps others who are thinking of doing the same :-)
dandywarhol Been here a while
Number of posts : 163 Age : 69 Home City : Edinburgh, Scotland Model and year : 1995 LH129V 2.8 Superlong semi hi top campervan 4WD with Mitsubishi turbo Registration date : 2010-01-26
Subject: Re: MNC - Updated 16/02/2019 Sun Dec 12, 2010 11:34 pm
Just come across this thread, did the same to mine but used thinners to remove the bronzey gold.
..
Are you happy that those 91 tyres are ok for the weight of your van? They're only for a MAX of 615 kg per corner - think of that when your loaded with people and hit a pothole..........
If you'd these in the UK and anything happened involving your insurance, they'd tell you to take a hike....................
AussieQ Hiace Master
Number of posts : 884 Age : 77 Home City : Hervey Bay Qld Model and year : 1994 sc Registration date : 2008-08-15
Subject: Re: MNC - Updated 16/02/2019 Mon Dec 13, 2010 2:52 am
Pretty fussy here in Aus as well. Anything to get out of paying
MNC Been here a while
Number of posts : 120 Home City : Wellington, New Zealand Model and year : 1997 SCG 3LDT KZH100G Registration date : 2009-09-21
Just come across this thread, did the same to mine but used thinners to remove the bronzey gold.
..
Are you happy that those 91 tyres are ok for the weight of your van? They're only for a MAX of 615 kg per corner - think of that when your loaded with people and hit a pothole..........
If you'd these in the UK and anything happened involving your insurance, they'd tell you to take a hike....................
Looking good there man, havent seen that colour scheme before.
dandywarhol Been here a while
Number of posts : 163 Age : 69 Home City : Edinburgh, Scotland Model and year : 1995 LH129V 2.8 Superlong semi hi top campervan 4WD with Mitsubishi turbo Registration date : 2010-01-26
Thanks - just had it resprayed in a Peugeot colour - really freshens it up I think and I LOVE the bling grille
I just didn't get on with the bronzy gold and 70s 5 stripes
MNC Been here a while
Number of posts : 120 Home City : Wellington, New Zealand Model and year : 1997 SCG 3LDT KZH100G Registration date : 2009-09-21
Subject: Re: MNC - Updated 16/02/2019 Tue Dec 14, 2010 4:08 am
Im thinking of upgrading the turbo, front mount an intercooler and run an aftermarket ecu to see what i can get out of it. I noticed that you have a mitsi turbo....how does it go?
dandywarhol Been here a while
Number of posts : 163 Age : 69 Home City : Edinburgh, Scotland Model and year : 1995 LH129V 2.8 Superlong semi hi top campervan 4WD with Mitsubishi turbo Registration date : 2010-01-26
awesome pipe work, any noticeable power gains? after market ecu?
dandywarhol Been here a while
Number of posts : 163 Age : 69 Home City : Edinburgh, Scotland Model and year : 1995 LH129V 2.8 Superlong semi hi top campervan 4WD with Mitsubishi turbo Registration date : 2010-01-26
Yep - recently had a drive in a non turbo 2.8 and was so pleased I bought this one, unwittingly - I hadn't realised mine was a turbo until I lifted the driver's seat lids!
No ECU - just a dead simple bolt on turbo
MNC Been here a while
Number of posts : 120 Home City : Wellington, New Zealand Model and year : 1997 SCG 3LDT KZH100G Registration date : 2009-09-21
Oh yup, no ecu as not efi? Looks good and glad your happy with the power gains.
Ill have to do abit more research into what sort of turbos are good for the 1kz motors and if there are differences i need to know regarding petrol vs diesel turbos....
MNC Been here a while
Number of posts : 120 Home City : Wellington, New Zealand Model and year : 1997 SCG 3LDT KZH100G Registration date : 2009-09-21
Subject: Re: MNC - Updated 16/02/2019 Sun Dec 18, 2011 9:29 am
Hey all,
well its been a while since ive posted anything.....but i have had a pretty productive weekend so heres some things ive done.
First.... I fitted some Cobra Low springs in the van...pics below.
Cobra low springs
Jack up and place axle stands under the diff - I used 3ton axle stands and a 3ton jackunder the diff head for extra safety and support
Using a 22mm 1/2" tube socket with strong arm, undo the bolt, once lossened i placed the jack under this arm to relieve pressure from the bolt and using a hammer, i used another bolt the same length and tapped it through.
Once the bolt is free, you can drop the arm under using the jack in a controlled manner.
Comparisons of the original spring and the new Cobra Low spring
When putting it back together, make sure the springs are in their locators and assemble in reverse order.
i didnt manage to take pics of the torsions for lowering the front but this was reasonably simple. located just rear of halfway of the van. 2 nuts are holding the torsion bars,1 of which is a locking nut. using a 22mm tube socket, separate the two and completely take off the locking nut. passengers side you will have to take of the stone guard to have better access to the torsion bar. To make things easier, jack up the side you are lowering to relieve pressure off the torsion bar and to ensure you do not strip the bolt. I wound down till there was 10 threads left as a base to work from. once i had sone this, i measured on a flat surface from the ground to the bottom of the guard arch on the rear arch to see how much i needed to lower the rear and compared. Go for a little drive to let the torsions settle and re-measure on a flat surface. Keep doing this and winding till you get the desired height and that your happy with it. It will be alittle more bumpy but hey thats the sacrifice, imo, worth it. Always use the measure method and not go by the threads as this differs.
Tips: - I have brand new shocks in the front so i was sure that i did not have one soft shock and so on. - Make sure you have the same psi in tires to get a true measurement. - Strong arm, tube sockets, Good jack and axle stands are a must.
nalo_b likes this post
MNC Been here a while
Number of posts : 120 Home City : Wellington, New Zealand Model and year : 1997 SCG 3LDT KZH100G Registration date : 2009-09-21
Subject: Re: MNC - Updated 16/02/2019 Sun Dec 18, 2011 9:34 am
I also completely re-wired the 4 rear speakers and pulled the entire van interior apart to do this, pics to come soon.
next on the list is the replace the dash lights as some have blown that i just havent bothered to replace but have now had a look to see what bulbs are needed.....until then....
MNC Been here a while
Number of posts : 120 Home City : Wellington, New Zealand Model and year : 1997 SCG 3LDT KZH100G Registration date : 2009-09-21
Subject: Re: MNC - Updated 16/02/2019 Sun Dec 18, 2011 9:38 am
In the new year, ill be getting a front mount intercooler on and doing the EGR (exhaust gas recirculation) mod, which is a matter of getting rid of the pipe the feeds exhaust gasses back into the intake.....block off both ends where the pipe is plumbed into.....stupid from factory to have such a thing, aparently instant power gain so will soon see....
AussieQ Hiace Master
Number of posts : 884 Age : 77 Home City : Hervey Bay Qld Model and year : 1994 sc Registration date : 2008-08-15
Subject: Re: MNC - Updated 16/02/2019 Sun Dec 18, 2011 6:54 pm
Great pics from both, good thread
dandywarhol Been here a while
Number of posts : 163 Age : 69 Home City : Edinburgh, Scotland Model and year : 1995 LH129V 2.8 Superlong semi hi top campervan 4WD with Mitsubishi turbo Registration date : 2010-01-26
Remember to have the suspension at the natural height in the vehicle before tightening up the suspension pivot bolts/nuts - otherwise you'll tear the bushes (if tightened up with the axles unsuspended on stands)
MNC Been here a while
Number of posts : 120 Home City : Wellington, New Zealand Model and year : 1997 SCG 3LDT KZH100G Registration date : 2009-09-21
Keeping an eye out over the next few weeks and re-measure to see how the settlement goes and re-tighten everything.
dandywarhol Been here a while
Number of posts : 163 Age : 69 Home City : Edinburgh, Scotland Model and year : 1995 LH129V 2.8 Superlong semi hi top campervan 4WD with Mitsubishi turbo Registration date : 2010-01-26
Don't just retighten - slacken off everything first then retorque - if you tightened them up "hanging" in the first place - otherwise ignore this rambling ol' fool.....................
suhayb Not so new now
Number of posts : 51 Age : 34 Home City : bradford Model and year : super custom 3 litre 1994 L Reg Registration date : 2011-02-24