|
| | Camping conversions! |  |
|
+6djathens JT69 aistobistoc Hiace4wd AgathaAlice GPW 10 posters | |
| Author | Message |
|---|
GPW
Hiace Master


Number of posts : 1530
Home City : Cambridge, UK
Model and year : Model: KD-KZH100G-MRPGT
Year: 1996
Colour: 4K1
Trim: FN42
Registration date : 2016-07-16
| Subject: Camping conversions!  Tue Aug 21, 2018 12:29 pm Tue Aug 21, 2018 12:29 pm | |
| Whether it's as a day van or a full camper, this thread is for pictures and ideas for using the Hiace as a camper, because - why wouldn't you  . | |
| | | | GPW
Hiace Master
Number of posts : 1530
Home City : Cambridge, UK
Model and year : Model: KD-KZH100G-MRPGT
Year: 1996
Colour: 4K1
Trim: FN42
Registration date : 2016-07-16
| | Subject: Re: Camping conversions! Wed Aug 22, 2018 8:55 pm | |
| The current layout is: 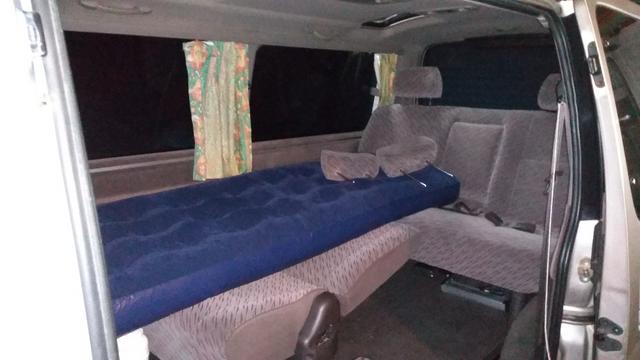 So a type of day van with the ability to sleep for 1-2 people (1 person layout shown, or the 2nd person a 1m 0.45m height aluminium trestle and another air bed is used). The air bed is required to even out the seat undulations. Without pulling out the back seat it's used as a barrier - so behind it right at the back a cheap but useful plastic drawer unit fits on one side (accessible by leaning over the back seats!) and a folder bike on the other side, then in the day the airbeds can be pushed to the back and the swivel seat swung round to face the door. With the headrests removed from the swivel seat it slides toward the back of the van enough to allow a small loo to be slid in at the foot of the bed (just behind the drivers seat), a Fiamma Bipot 30. The 30 is 30cm high so it can also fit under the read seat backrest when folded flat. | |
| | | | GPW
Hiace Master
Number of posts : 1530
Home City : Cambridge, UK
Model and year : Model: KD-KZH100G-MRPGT
Year: 1996
Colour: 4K1
Trim: FN42
Registration date : 2016-07-16
| | Subject: Re: Camping conversions! Wed Nov 28, 2018 4:36 pm | |
| Decided to revive this thread as 3 people are converting SCs on here now.
Please post any and all your conversion info for convenience, here is good!
The Hiace is small but I think JUST big enough to make an awesome camper, even the short one (i.e. mine).
Copy/pasted from another thread:
I have decided to take a chance on the 43L fridges for £80 like this:
https://www.amazon.co.uk/Inventor-Internal-Capacity-Dormitories-Eco-Friendly/dp/B0796TQ517/
and an inverter, using the money saved to pay for a solar panel, charge manager and extra leisure battery.
This fridge will be positioned behind the drivers seat about 30cm off the floor door opening to the rear. That leaves the rear compressor to sound and cool behind the drivers seat leaving minimum sound to disturb sleep and also good security for turning and braking, just needing to be restrained from breaking free under the immense power of the 1kz Very Happy
The sink will be near the door behind the passenger seat for easy access to water bottles, tap fed by pressurised garden sprayer bottle for silent, convenient operation.
A Planer 2kw heater will replace the rear heater radiator and vents and blow hot air up ducting to the rear woodwork for distribution to the van interior.
Heads will be right next to the back door, the long side will be thin except for a tiny 'rail' cupboard for phones, cups and heater ducting. The short side will be built over the wheelarch to give a 120cm wide double width and removing slats a 85cm single sleep space.
Between the side will be a removeable backrest that sits 6" off the bed to allow sitting up in bed (looking forward and back) and also to form a forward seat when in 'day' mode next to the short side. The long side will extend with mattress right to the fridge to for a seat next to the fridge to look out of the big side door, so you get corner seating lounge.
When the bed is deployed a curtain from the back of the moonroof opening will come down to allow privacy to anyone using the Fiamma 30cm loo that fits under the bed in use. Another similar curtain to drop over the front seats.
Not quite sure where the portable cooker will live but a flap from the wider short side cupboard will swing up and clip to the sink to form a table across the door for it to be used when the door is open. Another slide from the bed out of the tailgate will give the cooker a 2nd position for rainy days (bed converted to single mode to allow passage).
The aims are:
1. Allow comfortable single use (bed + seat)
2. Allow comfortable double use (bed + seat with privacy
3. Allow seating to look forward and sideways
4. Allow the bed to remain mostly made in day mode
5. Allow sitting up in bed both directions
6. Allow decent Hifi (seatbelt points may be used for small tannoy speakers, sub under bed)
Popup mains sockets will allow access to power each side and hookup socket ideally concealed near step where is stays dry.
| |
| | | | GPW
Hiace Master
Number of posts : 1530
Home City : Cambridge, UK
Model and year : Model: KD-KZH100G-MRPGT
Year: 1996
Colour: 4K1
Trim: FN42
Registration date : 2016-07-16
| | Subject: Re: Camping conversions! Wed Nov 28, 2018 4:46 pm | |
| Electrics:
Was thinking about electrical layouts and decided that as I'll be running an inverter almost full time (for the fridge when there is no electric hookup available) going for a 24V inverter would be far better.
Power is the product of current (Amps) and voltage (Volts).
So to suck 500W out of a 12V battery gives a current of 500 / 12 = 42A
Out of a 24V battery that is 21A.
Halving the current halves the losses in the wires, fuses and transistors (more efficiency), reduced heat and means the voltage only has to be multiplied by 230 / 24 = 9.6 rather than 19 times.
Lorry batteries and electricity is usually also 24V so all the automotive lamps etc are available for 24V, but any 12V stuff can still be used via a simple step-down converter, so there is no downside of 24V. In our vans 24V will in general mean two smaller 12V batteries wired in series rather than a giant 24V, allowing easier placing and securing.
The only puzzle I had was how to charge a 24V battery from a 12V van system when driving, but there are converters that solve this problem, e.g:
https://www.powerstream.com/dc-charger-12v-24v-12A.htm
So I'll be using two small leisure batteries an a 24V system in my van for an efficient inverter system to run the fridge, which I think needs 70W when the compressor is running, and the 0.8 - 1A standby current of the inverter when idle. | |
| | | | AgathaAlice
Im not old...just experienced

Number of posts : 350
Age : 71
Home City : Hamilton New Zealand
Model and year : As of August 1st 2022 we no longer have a Toyota.
Registration date : 2018-08-31
| | Subject: Re: Camping conversions! Fri Nov 30, 2018 7:53 am | |
| 0.8 to 1 amp standby sounds very high! 0.8 amps x 24 hours is 19.2 amp hours per day just for nothing coming out of your batteries. You don't say what amp hour capacity of batteries you're looking to install but remember that you need to be able to charge that amount and also support any load at the same time and that it is recommended not to discharge even deep-cycle batteries below 50% charge repeatedly. That charge needs to come from your alternator when the engine is running and from your solar panel(s) when it is not. Solar panels won't ever deliver their rated output on a campervan as they will almost never be facing directly to the maximum solar radiation (horizontally mounted most likely) and even the least shadowing of a panel will reduce its output significantly.
There used to be inverters that would sense when a load was applied and start up, which meant almost no standby current at all. Your fridge most likely won't like the square wave output of many inverters (frequently incorrectly described as 'modified sine wave which should actually be 'modified SQUARE wave'), you'll need to go for a pure sine-wave type.
Why were you looking at 500 watts draw when you say the fridge is 70 watts multiplied by say 100/80 to allow for 80% efficiency in the inverter? | |
| | | | GPW
Hiace Master
Number of posts : 1530
Home City : Cambridge, UK
Model and year : Model: KD-KZH100G-MRPGT
Year: 1996
Colour: 4K1
Trim: FN42
Registration date : 2016-07-16
| | Subject: Re: Camping conversions! Fri Nov 30, 2018 11:33 am | |
| Hi AgathaAlice!
Agree 100% with your post. I always avoid 'Modified Sine Wave' converters ever since I bough a 1000W one that failed to run a small LCD TV LOL, it was clearly hopeless and the huge number of harmonics caused everything I connected to buzz horribly !! So it's only genuine Pure Sine wave to be considered, the other type is just ballast.
Since looking at standby currents of inverters I have discovered some useful information.
There are two types of inverter:
1: HF (High Frequency), small, cheap, rather heavy on standby.
2. LF (Low frequency), big, heavy, expensive but 2-3 times better standby. And more robust.
The LF type is therefore the ones we are interested in for a 'always on' 230V system in a van. The LF one's generate a 50Hz sine wave at low voltage and then use a big transformer to step it up for use. This transformer guards the inverter against all sorts of issues too. And is why they are heavier.
After much research of eBay, Amazon and canal boat, caravan and camping forums I worked out that the best idea was to buy a good brand that was an 'inverter-charger' with switchover. This makes the wiring very simple because you connect the box to the mains, connect it to the batteries, connect up your sockets and it does all the hook-up switching, battery charging and management and even acts like a UPS against disconnection and power cuts.
The box I chose in the end is the Victron 24/500 Multiplus (Now ordered from Bimble Solar). This has a 2W standby mode which on a 24V system is exactly 2Ah per 24 hours, so leave it on for a week and it only uses 14Ah.
It may be possible to do it cheaper, but I thought of how useless a blown £150 chinese inverter would be when I needed it the most and so bought the Victron. As it does the charging and switchover as well I thought it was an ideal fit. I think this is where real money is worth spending.
The 500W draw you mention is a good point. The need for that is because some motor powered items such as fridges need between 3 to 10 times the rated current to start them up. As the compressor motor sits still it needs a good kick of current to make it move so a 70W rated fridge (My table-top fridge) can get a peak power of over 900W from the Victron 500 if it needs it.
The only issue remaining to be solved is the 12V heater power, 10A when starting and stopping. I need a 2kW diesel heater, the Planar one are expensive so in this case I'll go cheap chinese, but 24V ones are tricky to get so I plan to get a 3rd battery to run that from. Sealed 75AH leisure batteries with 3 yr warranties seem quite cheap and small so I will probably use 2 for the inverter power and 1 just for the 12V heater and other 12V things.
This 3 battery system then only presents an issue for charging. The 24V pair is then charged from a split charge relay feeding a boost circuit, which are on eBay for about £12 and seem to work.
The 12V heater battery can then be charged from the split charge too and then by a regular car battery conditioner from a 240V relay actuated by plugging the hookup in.
What do you think of the plan? | |
| | | | AgathaAlice
Im not old...just experienced
Number of posts : 350
Age : 71
Home City : Hamilton New Zealand
Model and year : As of August 1st 2022 we no longer have a Toyota.
Registration date : 2018-08-31
| | Subject: Re: Camping conversions! Sat Dec 01, 2018 6:52 am | |
| Victron is good gear. I didn't know anyone still made transformer type inverters, but at least being direct at 50Hz you won't get any interference to any radio equipment you also want to use.
I agree some fridges need a quite bit of a kick to start them so your choice seems good.
Most if not all of the Chinese inverters won't even deliver half of their supposed rating!
I take it you're saying you will have mains power available frequently for charging so this will simplify things a lot.
We don't have an inverter in our van although we've talked about it, we ended up buying a top-loading chilly bin style fridge which happened to be on clearance special and its compressor works directly on 12 or 24 volts; seems to be fine and is reasonably quiet running.
Is that 10 amps for the heater for a pump and ignition? Where have you got room for all this? I had enough trouble fitting one 115AH battery along with the fresh water and grey water tanks and the porta-loo, and ours is a long wheel base van ...... | |
| | | | GPW
Hiace Master
Number of posts : 1530
Home City : Cambridge, UK
Model and year : Model: KD-KZH100G-MRPGT
Year: 1996
Colour: 4K1
Trim: FN42
Registration date : 2016-07-16
| | Subject: Re: Camping conversions! Sat Dec 01, 2018 10:45 am | |
| Yes I've not heard anything good about chinese inverters except for the odd small one for casual usage, some (probably most) are way overrated as you say and to survive a fridge cycling would be somewhat optimistic  . I could have got a camping Waeco compressor fridge for £550 to do the job - an equally good approach, I just couldn't face spending that on a fridge . As it's a small van I'll really need to get to a shower and dump station every couple of days anyway so I really need 3 days max for the battery operation, which can always be helped by running the engine if it really gets low. It doesn't help that only half the charge is available from a lead-acid, Lithium would be better (75% charge?) but is hugely expensive for an occasional vehicle. Solar would be nice but as it's a super custom I have no roof space. However under the moon-roof glass in the sun-shade I can fit between 60-80W flexible panel giving a realistic 30W: i.e. a useful trickle charge. Or I can design a slide-out space to store a bigger flexible panel inside the van and use it now and again, but it would be tricky. Space is a good point. The design currently is a 1/2" ply panel running down the long side holding in the insulation to the van side, cut around the wheelarch. This is my chosen narrow side of the van. So from right to left it's a narrow side, 120cm gap for the bed, then a deeper side positioned on the short side that boxes in the LHS wheel arch. This can be uses for small cupboards. That leaves a 190cm x 120cm area under the double bed. But I'm making it a 'occasional' double that can be a comfortable single so the permanent single will be on the narrow side screwed to a rail and coming out about 70-80cm. Of this 190cm x 70cm fixed area a chunk is unavailable due to the adaption of a corner seating plan facing the sliding door and front, but that is minimal as most of that comes out of the optional double. So in theory I have a 190 x 70cm area of 35 - 40cm tall for 'stuff'. A 50x50cm section goes for storage of the Fiamma 30 so that leaves about 1 square metre of permanent floor and 15cm x 140cm = 0.21cm under the fat cupboard on the short side. This short side cabinet can overlap the door like on the hi-top Ducatos so it could be a useful but longer, subject to preserving space to use the loo with the bed made. That leaves a gap behind the drivers seat of around 0.25m^2 for the fridge and heater. The fridge must be elevated about 40cm up so the top is level with the seat top or headrest which leaves space for a cubby hole and part of the heater, the rest taking from under the seat/single bed, so it gets rid of the fridge but adds no storage. The heater must live here as it's the only easy, clear space to get to in the van underneath and also it stays pretty dry underneath even when driving in the rain due to the front mudflap. The sink unit is built behind the passenger seat and takes some care of itself if water capacity is not such an issue. If I need to I can locate the water tank remotely (a big pressure spray bottle) and plumb in a pipe to the tap. e.g: https://www.ebay.co.uk/itm/Pressure-Sprayer-2-5-8-16-20-Litre-Manual-Bottle-Knapsack-Weed-Killer-Garden-LTR/360857374663 So as to your question about space: yes, definitely very limited. I have an option of fitting a battery underneath the engine battery if I make up a hanger for it. As it's heating only it doesn't have to be that big. Another option is to start with a 15A DC-DC converter from 24V to 12V for the heater (about £12 and pretty small) so I just stick with two. The 10 amps when the glowplug of the heater is on, it does it for startup and also to clean it at shutdown. Running is about 1.5A or something, depends on power setting. A low-as-possible setting is desirable to reduce cycling (switching on and off). | |
| | | | GPW
Hiace Master
Number of posts : 1530
Home City : Cambridge, UK
Model and year : Model: KD-KZH100G-MRPGT
Year: 1996
Colour: 4K1
Trim: FN42
Registration date : 2016-07-16
| | Subject: Re: Camping conversions! Sat Dec 01, 2018 8:57 pm | |
| Current plans after a bit of measuring etc: 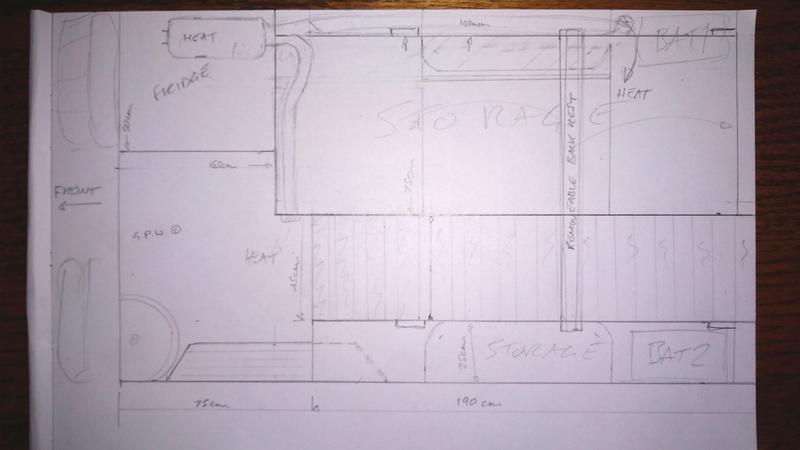 The main single-bed section is 75cm by 200cm and should end up with 33cm vertical space underneath (to fit the Fiamma bipot 30 into). The top (RHS long side) has a 100mm section up to windowsill height, the section above the wheel-arch giving space for control panels etc. The bottom (LHS short side) has a 190cm x 25cm space and also goes up to windowsill height. The 45cm section consists of optional fill-in wood for the double bed usage. The front bit is 50cm long and is removed for 'corner seat mode'. Corner seat mode uses a travelling removable backrest. This backrest is in the 'corner seat mode' position. At night it sits at the back on top to stop cold falling from the back window. Sitting up in bed to look out the tailgate is done by positioning toward the front. The main 'single bed' box platform will have access panels in the top and on the side (in the 45cm passage) for pull-out plastic storage drawers. On a box around 150mm hight (for a drawer etc) is the fridge. Between the fridge and sink there will also be some storage. Hopefully this should give a layout good for 1 and 2 people and also during the day allow seating that can see out of the side door as well as the windows.
Last edited by GPW on Sun Dec 02, 2018 6:57 pm; edited 1 time in total | |
| | | | AgathaAlice
Im not old...just experienced
Number of posts : 350
Age : 71
Home City : Hamilton New Zealand
Model and year : As of August 1st 2022 we no longer have a Toyota.
Registration date : 2018-08-31
| | Subject: Re: Camping conversions! Sun Dec 02, 2018 6:10 am | |
| That all looks very good. I must get Carole (who our van is really for) to take some detailed photos of hers/ours and then figure out how to post them here. My name is Tony, btw, and the idea is for Carole to head for parts unknown and leave me at home with the cats in peace ....
So far we've had a succession of problems; there's one more we have to overcome before she can safely head out again.
The layout of ours was partly determined by how it was when we got it, we've kept as much of the original concept as we could as I'm no carpenter and much of what was there did look rather good. The previous owner used it as a business entertainment vehicle not as a camper so I removed the disco lights, big power amplifier, 'Knight Rider' lights at the rear etc and have made it comply with our laws as regards external lights. The walls are lined with thin ply over which imitation leather has been glued; this looks very nice, but I so wish they'd held it all on with screws so I could get access behind easily, unfortunately the ply was stapled to support timber before the padding was applied so no access now without destroying the look which has made running cables VERY difficult!
The sliding door of the original vehicle has been removed and replaced with a batwing style door which makes it awkward in parking lots but gives a lot more wall space on that side. All that was done in Japan long before it was exported to NZ.
We do not have any heating for the house part; if the van originally had rear heating it has been removed and anyway would not be of much use when parked so Carole keeps a small electric fan heater and a suitable RCD protected power cord to poke out through a window when she's at a camp ground, otherwise she has plenty of blankets for the night time.
| |
| | | | GPW
Hiace Master
Number of posts : 1530
Home City : Cambridge, UK
Model and year : Model: KD-KZH100G-MRPGT
Year: 1996
Colour: 4K1
Trim: FN42
Registration date : 2016-07-16
| | Subject: Re: Camping conversions! Sun Dec 02, 2018 7:25 pm | |
| Hi Tony! A succession of problems is normal . Is that with the van or the conversion? You may want to contact a trimmer, they go to the camper shows as they may be able to suggest or re-cover your panels to allow you to move to screws. Else a metal detector/magnet may allow you to remove it (damaging only the bits that you need to access to remove the stables/nails/hidden screws, then to replace screw in new thin strips of wood (6mm ply cut into 30mm strips) that may look they were always supposed to be there. Would like to see a pic of the batwing door! I'm still removing Super-Custom parts, got the side heater out and the long side panels now. The heater matrix is quite small and cute, only about 4" x 10" but it made a lot of heat!! | |
| | | | AgathaAlice
Im not old...just experienced
Number of posts : 350
Age : 71
Home City : Hamilton New Zealand
Model and year : As of August 1st 2022 we no longer have a Toyota.
Registration date : 2018-08-31
| | Subject: Re: Camping conversions! Mon Dec 03, 2018 6:24 am | |
| Ours would have originally been a mini-bus not a genuine 'super custom' so apologies if it isn't really appropriate for this forum.
I have all the wiring done now and was able to do it with almost no damage to the trim, and what slight damage was done was able to be hidden successfully. My only regret was that I wish I could have seen the inside walls of an unmodified one and taken some pictures so I would have had a better idea of the structure beneath the plywood. There is an almost identical one at a wrecker which has provided us with some needed replacement parts, but they have filled it up with so much junk it isn't possible to see much unfortunately.
As I have worked as a communications radio tech for many years and in that time have done my share of installations I have acquired some tricks for getting wires into tricky places and I probably used every trick I know on this project.
The problems have been with the van itself but hopefully those have all been resolved now.
We now just need to have some towing hooks fitted in the front as we discovered when it broke down (luckily still in town) that due to the fibreglass mouldings the van can't be pulled up onto a tip-tray truck without major destruction so it needs to be able to be towed on the flat if necessary by a rope to a normal tow-bar. Carole won't be going anywhere in it again until that's done!
We're a little uncertain if the mouldings will be an issue if she wants to go across on the inter-island ferry because the van grounds out even on many driveway crossings due to the distance between the wheels and the extremities so it is necessary to go partly sideways to avoid damage.
Must research how to put up pics here, hopefully it isn't necessary to make an account with an image host site. | |
| | | | GPW
Hiace Master
Number of posts : 1530
Home City : Cambridge, UK
Model and year : Model: KD-KZH100G-MRPGT
Year: 1996
Colour: 4K1
Trim: FN42
Registration date : 2016-07-16
| | Subject: Re: Camping conversions! Mon Dec 03, 2018 10:30 am | |
| Don't worry about it not being a Hiace, no one will mind even if it's a Mercedes Sprinter LOL. I'll try to get some pics of mine unmodified with the panels off, could be a useful reference. To post pictures go here: https://postimages.org/ No account needed and it also resizes stuff for you - 800 is good to pick. There's actually a door controller rucked in on the RHS on the forward-most side panel, so yes, lots of puzzles! I may move that forward a bit. My loom to the back was installed on the inside of the metalwork as it's covered by the big side panel, luckily there is a cluster of plugs toward the back so I can unplug those, remove the rear RHS lamp cluster and unplug that and strip out the loom right back to the pillar behind the drivers seat, then thread it back so it's between the van side and the internal side.. Your van can also gain ground clearance by raising the front suspension a little, also improves the ride! Mine was super low (on the bumpstops) so I've raised it. It's still lower than spec. By removing my MPV seats and panels I've also saved weight, estimates: the single swivel 20kg, double swivel 30kg, rear bench 35kg, side panels 3 x 7kg = 21kg so about 100kg of camper can go in before it adds weight!! I also discovered I have to use slats for mattresses: no solid boards. This is to let the breath to stop mould growing, so I don't even have to cut boards and hatches, just to add spacers so that slats rest in place which I can pop out as required. 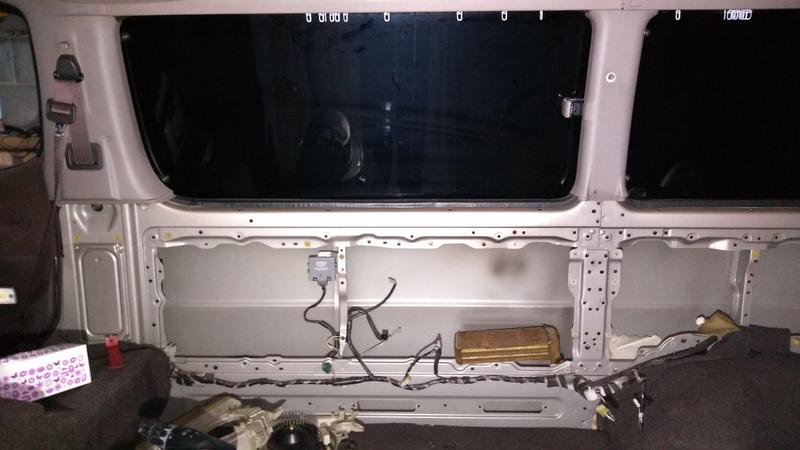 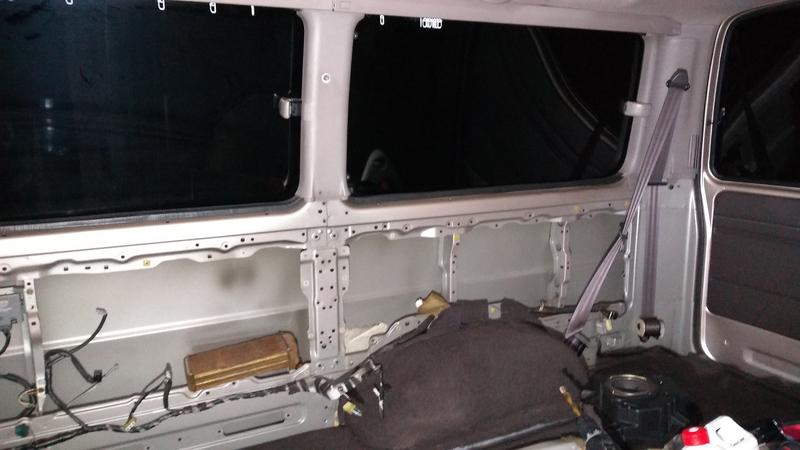 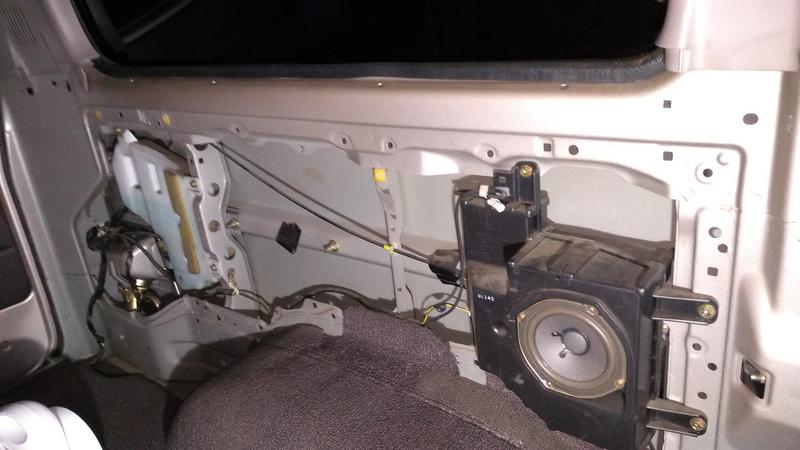 | |
| | | | AgathaAlice
Im not old...just experienced
Number of posts : 350
Age : 71
Home City : Hamilton New Zealand
Model and year : As of August 1st 2022 we no longer have a Toyota.
Registration date : 2018-08-31
| | Subject: Re: Camping conversions! Tue Dec 04, 2018 7:39 am | |
| Our van is a Hiace, just not an exact 'super custom' as shown in the other pics here. It would have been a long wheel base minibus in its first life but is most definitely a 1990 Hiace! The previous owner has already had it raised a bit so it must have been really bad for hitting things before.
Yours looks a lot different so those pics don't really reveal anything for me and as I said all the difficult interior bit is now done.
The Toyota people here are very helpful, and they can look up our van on their database and all the correct part numbers come up straight away; I just wish their prices were a little lower .....
I found a free no-registration image host which I'll try, I prefer to do all my own image editing not have someone else arbitrarily decide to resize things.
Ours has squabs which can be beds (2 single or one double) or rearranged to become bench seats with back supports and Carole has added another piece so she can sleep across rather than along, again this just lifts out and can be put to other uses.
She is finding the power output of the engine a little lacking, but I also think she hasn't mastered the auto gearbox fully yet; she's used to driving cars with full electronic control and this van has none of that. It has the 3L non-turbo motor, all purely mechanical and we had it weighed during our work so it will be slightly heavier now, it was 2190 kg so that's quite a bit for the 2.8 litre motor to push along. I followed her today and she did manage to get it up to 90 km/h for a few seconds, generally 80 km/h is the best it can do on the flat, much less when it faces a hill.
The tow hooks should be installed on Monday or Tuesday next week so, all going well, she may be able to slip away for a few days soon for a test. (Not too far away that rescue becomes difficult!) | |
| | | | GPW
Hiace Master
Number of posts : 1530
Home City : Cambridge, UK
Model and year : Model: KD-KZH100G-MRPGT
Year: 1996
Colour: 4K1
Trim: FN42
Registration date : 2016-07-16
| | Subject: Re: Camping conversions! Tue Dec 04, 2018 9:39 am | |
| Hi Tony, Yes I got that yours was a type of Hiace, I think about 1/3rd of the Hiaces on this site are not the exact 'super custom' model but they are all the same underneath - the variety of engines and gearboxes is the tricky bit, the 'super-custom' part really only seems to be the sunroofs. Apologies for any ambiguity in recommending https://postimages.org/ to you, resizing images is a useful option - it defaults to original size and gives you full control, even down to expiration. It's not like Google who decided to resize many people's images without their knowledge. I'll be impressed though if you find a better site than postimage, I view it as 'unlikely . I mentioned the re-sizing as I used it for the panel images to save me time. I selected the 3 to upload, told it to resize and one copy/paste later there they were: super convenient. 80km/h sounds a bit slow: have you run some injector cleaner through it? It can have a (one-time) benefit as they do get dirty. If 80kmh is normal I can now see why people like the 1kz-te engine: it's got an immense amount of grunt. The 3L motor does seem pretty solid though so I hope yours does well. BTW tell your daughter not to have the van towed along the road: the two hooks should only be used for loading onto a tow truck. Automatic boxes have their oil/fluid pump in the engine side for obvious reasons, so if the engine is stopped the box is not getting lubricated properly and can wear. Manual boxes are splash lubricated (no pump) so it doesn't bother them. | |
| | | | AgathaAlice
Im not old...just experienced
Number of posts : 350
Age : 71
Home City : Hamilton New Zealand
Model and year : As of August 1st 2022 we no longer have a Toyota.
Registration date : 2018-08-31
| | Subject: Re: Camping conversions! Wed Dec 05, 2018 7:00 am | |
| Carole is my housemate not my daughter and we have been in that setup for very many years now.
There won't be any choice but to tow the van to somewhere it can be repaired if it breaks down as it simply cannot be pulled up onto the tray of a truck without totally destroying the rear. The pulling was never the issue, the angle of tilt was, as we (fortunately) found out here in town: the back bottoms out long before the angle is sufficient to climb the tray and that was with the truck from a very specialized salvage company so a small-town towie with less capable equipment would have been in an even worse position.
Injector cleaner is going to be our next step in an attempt to get some more power. There is no smoke from the exhaust at any time so it's doubtful there is any issue with pistons / rings / bore, however she did comment that it felt better yesterday so some of it is the driver not the van. She'll be happy at 80 km/h on the flat, but she really would like it not to slow down so much when going up a hill, I think she has to get accustomed to the fact she will have to use the kickdown or even use the manual selector as it doesn't have all the electronics to tell it when to change down like our cars do.
I was surprised when I went to clean the air filter that it is accessed from under the van (and is surprisingly easy to get out and in) as I'd thought it was accessed from the plate behind the driver's seat. Didn't get much off of the filter so certainly wouldn't have justified replacement. The fuel filter was similarly clean, no sign of water in it at all but I did find the water sensor float switch works with a meter but doesn't bring up any warning on the dash so that's something I need to check up on next time I pull the dash out. I think I'll also do the temperature gauge modification detailed somewhere on this forum and I think the sensor in the coolant reservoir also doesn't work so that needs investigating too (if it ever stops raining long enough!) I just don't relish the thought of taking the instrument cluster out again as that speedo cable is devilishly hard to detach and reattach even with my small hands and long fingers and I've already fought with it several times; the cable just needed to be a few inches longer. | |
| | | | GPW
Hiace Master
Number of posts : 1530
Home City : Cambridge, UK
Model and year : Model: KD-KZH100G-MRPGT
Year: 1996
Colour: 4K1
Trim: FN42
Registration date : 2016-07-16
| | Subject: Re: Camping conversions! Wed Dec 05, 2018 10:56 am | |
| Hi Tony,
All noted. Will be interesting to see a side-on pic of the Hiace, sounds like a mega bodykit! I think my exhaust and spare wheel would be the first to touch down!
Careful replacing the air filter cover as it needs to fit exactly, mine was changed in Japan and they still has it slightly misaligned by about 5mm.
People have added turbos to the 3L engine - HiaceHobo did I think so that is possible. The other option is weight shedding - as it's a camper conversion you may find some savings to be made there in items rarely used and also perhaps some of the wood used is particle or MDF when thinner ply, fabric or slats may do.
Another weight saving I'll be doing is to use Puncturesafe in my tyres and to remove the spare wheel, the wheel hanger, the jack and the wheel nut tools. The spare is a standard steel wheel and while extremely strong in VERY heavy and doesn't match anyway, I think no puncture is also better then trying to change a van wheel on the road in the rain and cold when I need to get somewhere.
As for your coolant concerns I think you may have your thermostat at the front of the engine like it should be, may be worth replacing that if you want to guarantee reliability.
On my van now I've taken the side heater stuff out and just need to tuck the wiring loom into the long side properly and it will be ready for thinking about the fit-out! Going to see if I can get the fridge on a slideout so I can tilt the drivers seat forward and push the fridge there out of the cabin area. This adds as much space as a swivel seat does on other vans! | |
| | | | AgathaAlice
Im not old...just experienced
Number of posts : 350
Age : 71
Home City : Hamilton New Zealand
Model and year : As of August 1st 2022 we no longer have a Toyota.
Registration date : 2018-08-31
| | Subject: Re: Camping conversions! Thu Dec 06, 2018 6:34 am | |
| Pretty sure I got the filter cover back on correctly but will check again. It's hard to get underneath without a hoist but if I lie flat I can just get to things at the sides. The thermostat seems fine and looked clean enough when I had it out doing the repair that day.
I'll keep the spare wheel as it is; we bought a very stout trolley jack and it and the necessary tools are stored in one of the compartments under the bed squabs. Tyres these days don't seem very prone to punctures, I think if a tyre gets damaged it will be in need of changing, one of those cans is unlikely to help.
I think once she's been away for a few trips she'll work out things that she thought she'd want in the van but actually doesn't need so some of the clutter may come out although most of the weight comes from the very extensive fibreglass mouldings: the tailgate, for example, is very heavy. We had to replace the gas struts with custom-made stronger ones just to get it to lift up properly, although that went a bit far and now it needs a strong heave to close it but no doubt those struts will weaken a bit as time goes on and it will all balance out.
On yours try to keep any now unused wiring looms accessible, then you can re-purpose wiring for things you may want later instead of having to run new wires. A cable tracer is a very useful tool when doing that, if you don't have one then find someone who does data and phone cabling and borrow theirs (or them and it for a beer or two).
Carole made a cover with a cushion for the porta-loo so in-between 'needing to go' times it doubles as an additional seat and disguises it a bit since it is first inside the side door.
Maybe if the weather forecasts actually come true and it stops raining this weekend we can get some photos to put up here and maybe check those things I want to look into, but I won't hold my breath ...... | |
| | | | GPW
Hiace Master
Number of posts : 1530
Home City : Cambridge, UK
Model and year : Model: KD-KZH100G-MRPGT
Year: 1996
Colour: 4K1
Trim: FN42
Registration date : 2016-07-16
| | Subject: Re: Camping conversions! Thu Dec 06, 2018 10:14 am | |
| Thanks for the cable tracer tip, I'll try that. I have a useful 'rear heater' switch at the front so I may re-purpose that to enable/disable the diesel heater at some point, so I can switch it on 5 minutes before we stop in a cold spot so the living area is warm. Else I could use it as a 'switch everything off on the back completely' switch, either way I agree - useful wires! I have mine in the garage which is useful, although I had to build the garage first! It makes things easier in a way but not convinced it makes them better than buying new vehicles instead of building a garage  Interesting about the tailgate, my standard one requires a good pull to close it on the standard 1996 struts! Puncturesafe is not a repair, it's prevention! If I damage a tyre I'll call my breakdown cover, but it's rare to damage a tyre unless they are perishing from age. It also prevents slow punctures from robbing MPG and damaging tyres from heat which is useful as I don't generally have time to check the tyres on holiday. My Victron 500/24 turned up, the fridge I bought is nice and quiet so I just need to work out the exact layout and hence batteries to power it with. Looks a nice unit and can't see a fan so it should be quiet. Hopefully it won't hum, but will try to locate it somewhere away from sounding panels. | |
| | | | AgathaAlice
Im not old...just experienced
Number of posts : 350
Age : 71
Home City : Hamilton New Zealand
Model and year : As of August 1st 2022 we no longer have a Toyota.
Registration date : 2018-08-31
| | Subject: Re: Camping conversions! Fri Dec 07, 2018 7:14 am | |
| The issue with working on it in a garage is light. There's nothing to beat natural outdoors light when you're trying to do some work on it; torches / work lights / overhead lights never illuminate the bit you really need to see properly or at all.
It hasn't rained today but I had to go to work for the day so that prevented me from doing anything.
We're having problems with spiders here at the moment; leave any vehicle outside for more than a day and it becomes covered with annoying webs. Carole came home yesterday from the weekly shopping with a spray bottle titled 'Kiwicare No Spiders' so I think the van is about to get sprayed, maybe my second car which also lives outside will get done too (wonder if she will do it for me?).
| |
| | | | GPW
Hiace Master
Number of posts : 1530
Home City : Cambridge, UK
Model and year : Model: KD-KZH100G-MRPGT
Year: 1996
Colour: 4K1
Trim: FN42
Registration date : 2016-07-16
| | Subject: Re: Camping conversions! Fri Dec 07, 2018 10:27 am | |
| Not much light here in the garage now the sun's on holiday in New Zealand LOL !! The sunroofs help but its still very gloomy. I have a light on a stand which is good, and a couple of stick work lamps which always manage to fall so they shine right into my eyes.
Are the spiders poisonous in NZ? It sounds like there is a shortage of birds who might normally eat them, is there a bird attracting tree you can plant nearby? NZ is a great location to buy Japanese cars as it's much closer to Japan that the UK! | |
| | | | Hiace4wd
Hiace Master

Number of posts : 796
Home City : Netherlands
Model and year : 1994 Toyota Hiace 4x4 DIY camper
Registration date : 2016-02-01
| | Subject: Re: Camping conversions! Fri Dec 07, 2018 12:50 pm | |
| Hi GPW, didnt see the thread earlier.
I have a Planar 2kw and happy with it. And it is much cheaper than Eberspacher and Webasto. So is a Chinese ome than a really good option?
The Victron stuff is good. But sorry to say, why are you making things so complicated with 24V?
It always means 2 batteries, and you will regret it when one dies and takes the other with it, so you need to replace 2.
Anyway 500Watt is not impressive and if you hook up the 500W inverter right next to the battery, you're good.
Would avoid 24V at all times. I actually had 24V in our Landcruiser. | |
| | | | GPW
Hiace Master
Number of posts : 1530
Home City : Cambridge, UK
Model and year : Model: KD-KZH100G-MRPGT
Year: 1996
Colour: 4K1
Trim: FN42
Registration date : 2016-07-16
| | Subject: Re: Camping conversions! Fri Dec 07, 2018 4:38 pm | |
| Hi!
The genuine Planar came out as quite expensive, the Chinese 'planar' is about £130 so much cheaper. For the hours of usage it's not worth me paying more, I'll fit a smoke and CO sensor anyway so I think it will be Ok. It's quite compact and I'm fitting it on a spare bit of floor just aft of an air-box resonator.
500VA is really determined by the size, weight and expected usage - it's quite big and heavy as it's an LF design (contains giant transformer). The 24V bit is an experiment to see how it works out in a 12V van. It halves the current so has less loss when driving the fridge, not such an issue at 500VA but why not. It all looks after itself anyway as it's an inverter/charger UPS thing. The van can stay at 12V...
| |
| | | | Hiace4wd
Hiace Master
Number of posts : 796
Home City : Netherlands
Model and year : 1994 Toyota Hiace 4x4 DIY camper
Registration date : 2016-02-01
| | Subject: Re: Camping conversions! Fri Dec 07, 2018 10:38 pm | |
| Sure it will work at first. But please check if charging voltage is okay on the battery terminals of each battery in the 24v setup.
But 500W isnt much. Especially when it is only peak power. And on 230V wiring 500W is pretty much nothing impressive, as the amps are low. And when the inverter is next to the battery then it is only some amps on a very short cable.
So basically you are running a simple 70W fridge which could also have been a 12V fridge. Yes they are more expensive but you dont need all the extra gear. | |
| | | | GPW
Hiace Master
Number of posts : 1530
Home City : Cambridge, UK
Model and year : Model: KD-KZH100G-MRPGT
Year: 1996
Colour: 4K1
Trim: FN42
Registration date : 2016-07-16
| | Subject: Re: Camping conversions! Fri Dec 07, 2018 11:20 pm | |
| Your points are all good ones and valid, but I don't think there's any disadvantage, plus I want the extra gear to run stuff while off-grid. Plus my 24/500 is sitting on my coffee table waiting for be fitted. I did think about it for a fair while before ordering and decided to go 24V. In some ways 12V is simpler yes, but for me it's not much bother. My two batteries will be identical new ones so I don't see why one set of 6 cells should be any different from the other set of 6 cells - i.e. I'd expect it to remain in balance pretty much as an existing 6 cell 12V battery does. It's up to the Victron to charge it on hookup. I looked at the 12V fridges and around £550 there are some great waeco ones. However I need 230V anyway for laptop charging, charging of camera batteries, any power tool battery charging, model helicopter charging, electric toothbrushes, cheap mains TV etc - lots of stuff seems to need 230V. The 500VA is needed really just to start the fridge compressor, most of the time it won't be doing that much (which is why a LF low-standby one was needed), if I want to run hairdryers and kettles I can always upgrade one day. Costs are not too bad, 3Yr warranty 75Ah leisure x 2 = £100. Victron 24/500 = £365, Fridge £85 = £550. So for the price of a camping fridge (which would need a leisure battery anyway) I have a fridge and a decent mains system. Effectively I'm £100 ahead by going for a mains fridge, and if the fridge gets damaged I'm way ahead . | |
| | | | Sponsored content
| | Subject: Re: Camping conversions! | |
| |
| | | | | | Camping conversions! | |
|
Similar topics | |
|
| | Permissions in this forum: | You cannot reply to topics in this forum
| |
| |
| |
