| | 3L thermostat gasket |  |
|
|
| Author | Message |
|---|
tamarack
Been here a while


Number of posts : 101
Home City : Vancouver
Model and year : 92 Super Custom part time 4WD 2.8 3L auto
Registration date : 2010-04-21
| Subject: 3L thermostat gasket  Sat Mar 23, 2013 8:32 am Sat Mar 23, 2013 8:32 am | |
| got a new thermostat to put in. It comes with an o-ring gasket that fits around the top of the t-stat. the seal on the water outlet is done with a triangular gasket with silicone on both sides. A local mechanic who works on toyotas but has not worked on my van (lh107) says get a new triangular gasket and don't use silicone because it can gum up the t-stat. He also said the o-ring type gasket will blow the bi-valves. Any thoughts or experiences shared here would be most welcome. | |
|
| | |
Clive
Hiace Master


Number of posts : 1094
Home City : Bristol UK
Model and year : 2003 Range Rover 4.4 goes like a rocket and drinks like Oliver Reed!
Registration date : 2008-11-05
| | Subject: Re: 3L thermostat gasket Mon Mar 25, 2013 7:25 am | |
| Right confused now, first it fits on the water inlet and second the O ring is the sealing gasket, no triangular one on any of the Toyota Diesel engines I've changed on on. | |
|
| | |
simongd
Been here a while

Number of posts : 176
Home City : Liverpool
Model and year : Looking for my next
Registration date : 2010-01-28
| | Subject: Re: 3L thermostat gasket Mon Mar 25, 2013 9:29 pm | |
| When I changed thermostat I got a gasket from toyota. it was a thin metal sheet with that black film which seals once put through a heat cycle. there was no o-ring. infact, when I changed thermo there was an o-ring which i tried to use but ended up snapping the housing top where the bolt locates. toyota told me not to use it.
this was about two years ago and i've not looked back.
hope you get it sorted soon, you don't want that motor to overheat | |
|
| | |
tamarack
Been here a while
Number of posts : 101
Home City : Vancouver
Model and year : 92 Super Custom part time 4WD 2.8 3L auto
Registration date : 2010-04-21
| | Subject: Re: 3L thermostat gasket Tue Mar 26, 2013 2:53 pm | |
| so I should contact toyota? Clive what is your take on this? (I meant to say water inlet not outlet Simon is your engine a 2.4 2L is the water outlet different? and is it possible that this metal gasket is a recent innovation and that the o-ring gasket is a thing of the past because of the experince you had. I notice when i tried to take the bolts of (there are two 12 mm nuts ans one 12 mm bolt) the bolt seemed like it was silicned in because the threads were stripped. 4 different choices is confusing. | |
|
| | |
Clive
Hiace Master
Number of posts : 1094
Home City : Bristol UK
Model and year : 2003 Range Rover 4.4 goes like a rocket and drinks like Oliver Reed!
Registration date : 2008-11-05
| | Subject: Re: 3L thermostat gasket Wed Mar 27, 2013 7:42 am | |
| Like I say I have never seen anything other than the O ring. If there is a gasket I stand to be corrected. Just have a tube of silicon gaskethandy.
Tap a new thread and replace the bolt. | |
|
| | |
chr15
New Member


Number of posts : 18
Home City : Worcestershire UK
Model and year : Toyota Hiace Campervan part time 4WD
1995
LH119
Engine. 3L (2779cc)
Diesel
Registration date : 2017-02-28
| | Subject: Re: 3L thermostat gasket Tue Feb 28, 2017 4:16 pm | |
| Hi, just joined the forum and saw this post.
Been looking into the parts required for a coolant change on my van and found this post helpful. Thanks.
My van also has the round/triangular thin metal gasket on the thermostat housing. I can just about see the melted black heat sealant on it. Not sure if this gasket should be used in addition to the O-ring on the thermostat or not? Sounds like it may not be needed? Anyone know for sure?
Might also be worth getting the plastic Toyota radiator drain plug with O-ring (seperate part no.)
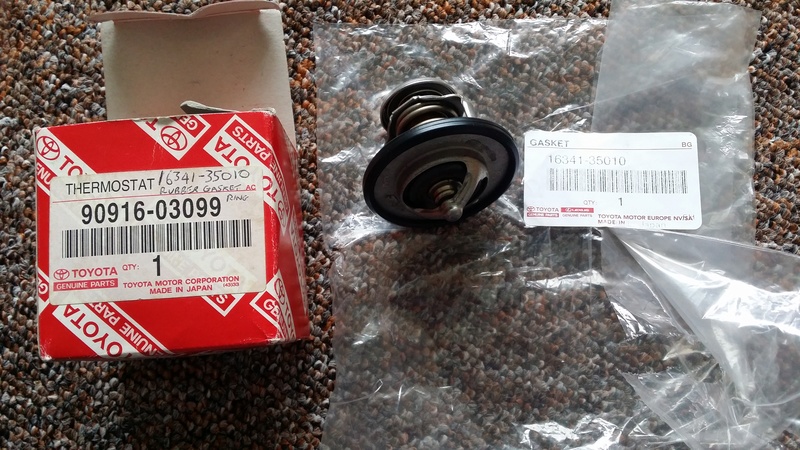
Part nos. 90916-03099 Thermostat
16341-35010 O-ring for Thermostat
16341-54040 Gasket for Thermostat housing
16417-75010 or 16417-24200 Radiator drain
plug.
16418-24200 O-ring for Radiator drain plug.
Last edited by chr15 on Mon Apr 30, 2018 12:22 pm; edited 3 times in total | |
|
| | |
GPW
Hiace Master

Number of posts : 1527
Home City : Cambridge, UK
Model and year : Model: KD-KZH100G-MRPGT
Year: 1996
Colour: 4K1
Trim: FN42
Registration date : 2016-07-16
| | Subject: Re: 3L thermostat gasket Tue Feb 28, 2017 5:39 pm | |
| Have you any photos?
If I was guessing (and I would be LOL) I'd look at it and decide which was the best solution in my mind.
My experience is that rubber seals tend to work, gaskets usually work, instant gasket is often a bad idea.
Where does the O-ring actually go, is it for decoration or does it fit into a groove and seal? If so - what's the gasket for?
BTW you may need to post a bit more to be able to display a photo. | |
|
| | |
TwentyOneThirtyFive
Been here a while

Number of posts : 222
Home City : Hertfordshire, UK
Model and year : Super GL Camper (Vantech), 2.8D 4wd, 1995
Registration date : 2016-08-04
| | Subject: Re: 3L thermostat gasket Tue Feb 28, 2017 6:04 pm | |
| When I ordered a thermostat recently it came without any o-ring. I ordered the gasket which I'm pretty sure was just a metal gasket. Both genuine Toyota parts. Fitted fine, no leaks.
I didn't need to change the o-ring on the drain plug, but my radiator did leak after I'd flushed it through! | |
|
| | |
chr15
New Member
Number of posts : 18
Home City : Worcestershire UK
Model and year : Toyota Hiace Campervan part time 4WD
1995
LH119
Engine. 3L (2779cc)
Diesel
Registration date : 2017-02-28
| | Subject: Re: 3L thermostat gasket Wed Mar 01, 2017 5:42 pm | |
| Was going to change the coolant as I wasn't sure when it was done last (only had van about 6 months). After a closer visual inspection and after testing the coolant using a multimeter it actually seems pretty good so am holding off a change for now.
Ordered the Toyota red coolant (Concentrate) part no. 0888980014 the Thermostat as above and the gasket for the thermostat housing. Also ordering the radiator drain plug as above. (O-ring bought seperately).
The Thermostat didn't come with an O-ring either. Maybe it's not needed? however when I do the change i'll see what's on there there then and replace it with the same. Perhaps the metal gasket has replaced the thermostat O-ring?? (which you have to buy seperately and which goes onto the top of the thermostat). Will update when i know.
Last edited by chr15 on Mon Apr 30, 2018 12:12 pm; edited 1 time in total | |
|
| | |
chr15
New Member
Number of posts : 18
Home City : Worcestershire UK
Model and year : Toyota Hiace Campervan part time 4WD
1995
LH119
Engine. 3L (2779cc)
Diesel
Registration date : 2017-02-28
| | Subject: Re: 3L thermostat gasket Thu Mar 16, 2017 6:40 pm | |
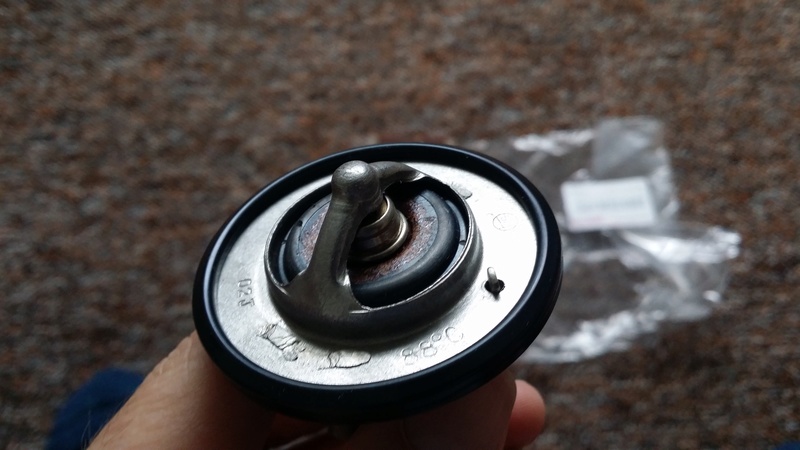
| Ordered the Genuine Toyota Thermostat for my van part no. 90916-03099 When i first looked at it the top of the thermostat it looked like it was rusted but after reading online have found out that it's not rust but some sort of browny red colour coating. Google "Kuzeh coating" and you'll see. Was a relief to find that out.  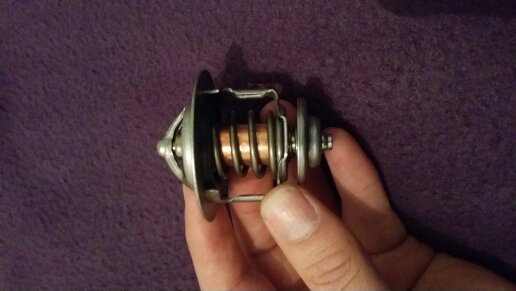
Last edited by chr15 on Mon Apr 30, 2018 12:20 pm; edited 1 time in total | |
|
| | |
chr15
New Member
Number of posts : 18
Home City : Worcestershire UK
Model and year : Toyota Hiace Campervan part time 4WD
1995
LH119
Engine. 3L (2779cc)
Diesel
Registration date : 2017-02-28
| | Subject: Re: 3L thermostat gasket Mon Apr 30, 2018 12:16 pm | |
| Water outlet gasket part no. 16341-54040  | |
|
| | |
chr15
New Member
Number of posts : 18
Home City : Worcestershire UK
Model and year : Toyota Hiace Campervan part time 4WD
1995
LH119
Engine. 3L (2779cc)
Diesel
Registration date : 2017-02-28
| | Subject: Re: 3L thermostat gasket Wed May 02, 2018 11:13 am | |
| | |
|
| | |
chr15
New Member
Number of posts : 18
Home City : Worcestershire UK
Model and year : Toyota Hiace Campervan part time 4WD
1995
LH119
Engine. 3L (2779cc)
Diesel
Registration date : 2017-02-28
| | Subject: Re: 3L thermostat gasket Mon May 14, 2018 12:07 pm | |
| Ok, finally got round to changing the coolant on my van, at the same time replacing the thermostat and triangular gasket.
Here's a run down of the procedure.
1. Put passenger side of van up on kerb (easier to get underneath)
2. Took off radiator cap (engine cold)
3. Slided the lever for heater blower inside to the hottest setting.
4. Got underneath van and carefully unbolted the rear two bottom metal plates (wd40 maybe needed). Removed plates in order to reach the drain bolt on the engine block. The engine coolant drain plug is a 12mm Hexagon shaped Aluminium bolt on the side of the engine block. note.- You can just about get a spanner or socket on it from above but then there's no hand room to actually undo it so had to reach it properly from the underneath reaching up to it with a 12mm socket using a small extension on the ratchet.
5. Slightly loosen the engine block bolt but don't undo it yet.
6. Next shimmy back out from under and then slide underneath a shallow plastic container (used a long single plastic under bed storage container - minus the lid of course) to catch the coolant. Getting back under first position the container under the radiator drain plug. This plug is easier to get to by hand from underneath and is located at the bottom of the radiator. It is a white plastic wing shaped plug reachable with hand and able to be carefully unscrewed (hopefully) by hand too. There is a plastic tube connected to the drain hole that allows the controlled flow of coolant from the drain into the container. Uncrew the plastic drain plug and let the coolant drain into the container.
7. Once radiator has drained, remove the plastic drain plug completely and replace the tiny rubber O-ring on the end of the plug with a new one. (essential to replace this.) Then screw the plug back as tightly as you can by hand only.
8. Next shimmy further back under the van again and position the container in the area underneath the engine drain bolt. Reaching up with ratchet/socket or hand undo the loosened engine drain plug. note.- be aware that the coolant from the engine block is basically coming out straight into your face and eyes in an uncontolled flow so reach up and undo the bolt without your face in the way (otherwise it will get you).
9. Let the coolant drain from the engine block into the container and then re-tighten the aluminium bolt using the 12mm socket.
10. Carefully re-bolt the two bottom metal plates (using a bit of grease on the bolt threads).
11. With the system drained, the two drain plugs retightened and the floor plates re-secured, slide yourself and the container full of old coolant out from underneath.
12. Using a plastic funnel carefully pour the coolant from the container into another disposable container (used empty 5 litre spring water bottles) did this via a 1litre measuring jug (to make note of the amount of new coolant that would need to be put back in again) - Got about 7 litres out of mine.
13. With old coolant in disposable containers (for disposal at the local tip - mine took them fine). Wipe clean the plastic container ready to mix the new coolant with de-ionised water. note. - (It was less expensive to buy a 5 litre Toyota red coolant (Concentrated/non mixed) and a 5 litre bottle of de-ionised water (halfords). This gives you up to 10 litres of coolant when mixed together, as opposed to buying the pre-mixed 5litre Toyota coolant which you would need to buy two containers off.
14. Note. - if you are planning to change the thermostat and gasket then do this first before re-filling the system.
15. Changing the thermostat and gasket was an easy process and was just a matter of undoing three bolts on the triangular shaped thermostat housing. On my van this was just a matter of hitching up the passenger seat and the housing is right there in front of your eyes on top so no problem accessing it. Undid three bolts/nuts on the housing removed it along with the thin triangular metal gasket then thermostat just lifts out from its seating within the housing. note. - On my van there was no rubber O-ring on the thermostat i was replacing so there was no need to use the new one that i'd bought just in case i needed it. There wasn't space in the housing seating for the O-ring anyway so it was unecessary on my van, i simply placed the new thermostat into the housing, replaced the metal triangular gasket and tightened up the three bolts/nuts again.
16. Refill the system with exactly the same amount of coolant as you drained out (a good way to avoid overfilling) I mixed the new coolant and the de-ionised water together beforehand in the plastic container (7 litres worth of 50/50 mixed coolant and water which is the ratio Toyota recommends under normal climate conditions.
I then used the 1litre measuring jug to scoop out the mixed coolant from the container and used the funnel to refill the system via the radiator cap filling hole.
note - refill new coolant slowly to avoid air getting into the system. Once i'd replaced the same amount of new coolant with that which i'd taken out i took the van down from the kerbside back to level ground.
17. Mix any leftover coolant with de-ionised water 50/50 (3 litres spare in my case) so you have some to top up the system with.
18. Top up the radiator level to the brim, replace the radiator cap and then ran the engine until fully warmed up (until fan runs/ thermostat opens if possible), checked underneath for any leaks from drain plugs etc.
Then whilst running the engine checked the coolant level in the plastic overfill/expansion tank (not by opening it) but by the max/min level markers on the side of the tank.
It's my understanding that the minimum level is the level the coolant should be at when the engine is cold and the maximum is the level at which it could be when fully hot.
So somewhere halfway between the two marks when the engine is warm is fine.
19. After running the engine and taking the van for a drive re-check the coolant level in the expansion tank (engine cold) and top up with coolant to the minimum level if necessary.
Not the most pleasant of job's but hope this helps someone to do it quicker and easier :-)
Any questions or comments please ask or add. | |
|
| | |
GPW
Hiace Master
Number of posts : 1527
Home City : Cambridge, UK
Model and year : Model: KD-KZH100G-MRPGT
Year: 1996
Colour: 4K1
Trim: FN42
Registration date : 2016-07-16
| | Subject: Re: 3L thermostat gasket Wed May 30, 2018 2:41 pm | |
| Great write up, thanks for the tips about the coolant purchase!! I am impressed at your choice of engine, mine is the 3 litre KZ1-TE that has it's thermostat rather inconveniently sited just behind the alternator - very tricky to reach (and probably what that rubber O-ring you have is for). http://jp-carparts.com/toyota/partlist.php?maker=toyota&type=711140&cartype=136&fig=1603 I wonder why Toyota decided to put the 3L one in such a daft place. I think this is yours: http://jp-carparts.com/toyota/partlist.php?maker=toyota&type=711140&cartype=7&fig=1603 Anyway your writeup is still useful for me, although I have a drain plug on the horizontal radiator II, a radiator I suspect you don't need as you have a properly located thermostat to start with  | |
|
| | |
Ace MM
Not so new now

Number of posts : 49
Home City : California USA
Model and year : 1990 Super Custom 4WD Diesel LH107
Registration date : 2016-10-12
| | Subject: Re: 3L thermostat gasket Mon Jun 18, 2018 4:45 am | |
| Re: item#3, if you have a rear heater i recommend opening and draining that section as well.
I found a hole in a line on mine and removed some sediment as well. | |
|
| | |
Sponsored content
| | Subject: Re: 3L thermostat gasket | |
| |
|
| | |
| | 3L thermostat gasket | |
|